
Henry Ford famously said, “Whether you think you can or you think you can’t, you’re right.” Now, you’re probably wondering why I’m starting a needlepoint blog post about texture with a quote from Henry Ford, aren’t you? Well, it actually has more to do with needlepoint than you might think.
You see, that quote from Henry Ford is really about how you look at things.
ALL things – from learning to speak a new language to choosing the best stitches and threads for your needlepoint projects. And at its core is self-confidence.
In order to be successful at something, you must first believe that you can do it. So, how do you garner the confidence to create hand-stitched masterpieces? I’m ever so glad you asked! 😉
When I first begin teaching my students about writing their own stitch guides, I tell them that we have to take off our needlepoint hats and put on our artist’s smocks.
What the heck does that mean? (Tee hee – I know it sounds a little kooky, but trust me. It’ll begin to make sense shortly.)
It all starts by making a simple mindset change…
When you think about your needlepoint canvases, I want you to recognize that what you really have in your possession isn’t just a needlepoint canvas. It’s an artist’s painting that has been rendered on a piece of open grid mesh canvas instead of on a standard stretched artist’s canvas.
And when you say that you want to write your own stitch guides, my hallucination is that you really want to take your two-dimensional painted canvas and transform it into a three-dimensional piece of fiber art. Am I right?
Not sure you understand? Here’s an example for you.
If you want to take a canvas like this…

and turn it into something like this…

then we’re on the same page.
Modifying your flat painted canvases into beautiful hand-stitched 3-D treasures by applying a variety of canvas embroidery stitches, techniques, and threads to add visual interest is definitely within your reach. You just need someone to guide you through the steps – and that’s what I’m here to do. 😉
Now, back to painted needlepoint canvases and artists’ paintings on stretched canvas…
We’ve already established that the only difference between the two paintings is the ground material upon which they’re painted.
The next step is to understand that there are seven Elements of Art and eight Principles of Design – and that they apply to your needlepoint canvases just as much as they apply to any other kind of painting.
Since we won’t have time to delve into all of the Elements of Art/Principles of Design here, I’ve chosen one that we can explore this week as it pertains to hand-painted needlepoint canvases – texture!
Texture is something that all stitchers can use to bring a two-dimensional hand painted needlepoint canvas to life.
How? Great question. Let’s think about that for a minute.
Texture can be added to a needlepoint canvas through the choice of thread.
Novelty threads, like Fuzzy Stuff, can make the trim on Santa’s coat fluffy and sparkly even when you use basic tent stitch. And if you want that teddy bear to be furry, add a strand of Wisper to Bella Lusso or Planet Earth Wool.
But you can also add texture to a canvas by using canvas embroidery stitches (a.k.a. decorative stitches).
Look at Sandra Gilmore’s “The Fourth”, for example…
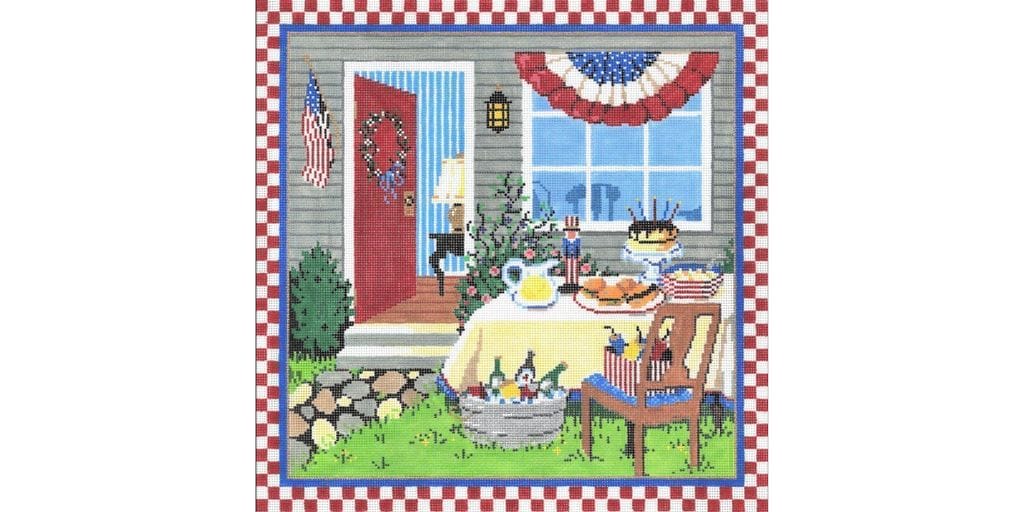
There are lots of options for adding texture to this design. Apply the Cashmere stitch to the brown floor inside the house to mimic the look of real hardwood. Or stitch that evergreen shrub in the diamond ray stitch so it really looks like a juniper bush. You could even add some blue French knots for berries. 😉
But wait – I’ll bet I know what you’re thinking.
How can you even begin to identify all the different ways that you can add texture to your projects?
It’s really pretty easy.
- First, make a list of the design components on your canvas.
- Then brainstorm descriptive words for each item.
Let’s use our canvas by Sandra Gilmore as an example again.
The design components on this piece are the…
- walls of the house
- bunting
- flag
- tall shrub
- grass
- sidewalk
- galvanized bucket and its contents – and so on.
You get the idea, right? It’s every single item on the canvas.
Now, let’s examine one of those design components more closely.
We’ll use the evergreen shrub from earlier to illustrate how this all comes together. What are some words that describe how an evergreen shrub looks or feels in real life?
How about…
- prickly
- jagged
- uneven
- pointy
- sharp
- rough
Once you have your descriptive words in place, you can begin to browse through stitch books to find possible stitches that capture that rough texture. Do this for each of the design components on your canvas to create a rough draft of which stitches you might use for your project.
Is looking at your canvases from an artist’s perspective making more sense now? I thought it might be. 😉
So, what are some ways that you could use canvas embroidery stitches to add texture to one of your needlepoint projects? Tell me in the comments box below… I’d love to hear from you!
Alrighty, my friend – that’s all for now.
I’ll see you again next week for more needlepoint goodness.
Until then, happy stitching…
XOXO!!


Thank you for giving me a procedure to follow. It’s not so overwhelming this way-step 1, step 2, etc. And the more I read, the more I learn. Thank you!
You’re very welcome, Monica! I’m so glad you’re finding the info helpful.
XOXO!
Ellen
What embroidery canvas is used for straight stitch
Hi – and thank you for taking the time to visit my website. If you’re asking about the straight Gobelin stitch (used in Bargello/Florentine embroidery), you can use just about any kind of canvas. Mono canvas is probably the easiest to find, followed by Penelope (aka duo canvas), then interlock.
Happy stitching…
XOXO!
Ellen