
Learning the basics of how to execute the long and short stitch is actually just the first step toward creating realistic shading on your needlepoint projects. (If you haven’t read part 1 of this blog series, click here to hop over and do that now – then, come back and keep reading. 😉 )
Now, let’s take a look at how to use the long and short stitch to create painterly effects on your canvases.
Hand painted needlepoint canvases can have varying degrees of shading. This cutie pie canvas from Melissa Prince is a great first foray into trying your hand at using the long and short stitch to create realistic looking fur.
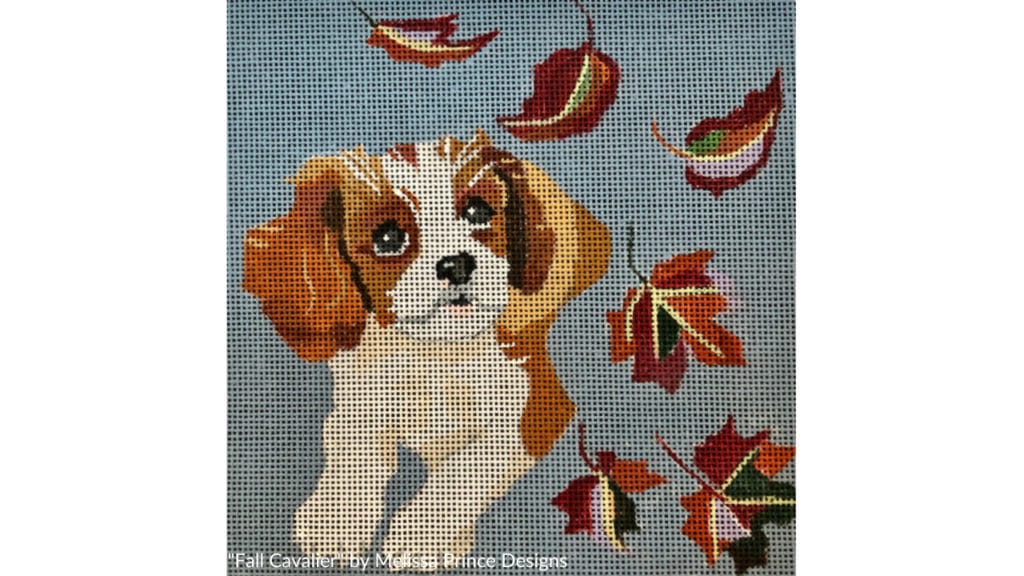
Why’s that? Well, mainly because it leans toward being more of a whimsical design than a realistic one. That means you don’t have to be as precise with your stitch placement. (YAY!!)
Now, you may be wondering where – or how – to even get started, so I’m going to walk you through the process I use to plan how I’m going to stitch a piece like this one. 🙂
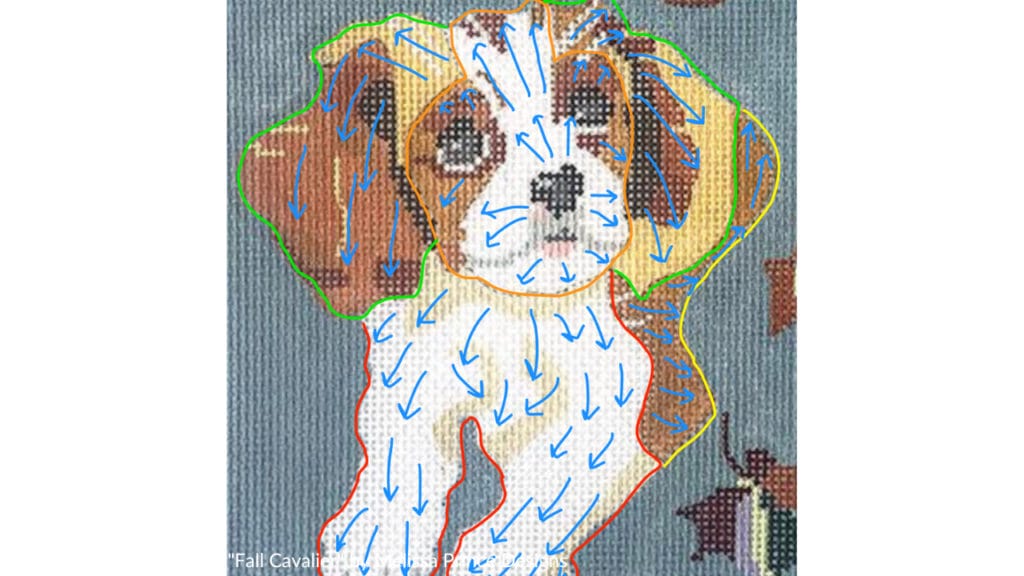
When the goal is to create realistic looking fur with your needle and thread, the first thing you’ll want to do is determine the primary shapes and lines of the design.
The easiest way to do that is to make a photocopy of the canvas. (The photocopy may be either full color or black and white.)
Next, you’ll need some tracing paper and a #2 pencil. Secure the photocopy to a light box (or a sunny window) with Scotch® tape. Then, place the tracing paper on top of the photocopy and secure it to the surface, too. Trace over the main design lines like you see in the picture below.

Find a few photos of the object you are stitching.
In the case of this design, you can call on Mr. Googles to locate pictures of Cavalier King Charles Spaniels – preferably those that look like the dog on the canvas.
Study the pictures, paying careful attention to the way the dog’s fur grows. Look at its ears. Does the fur on the dog’s ears look different from the fur on its head? What texture does the fur have where the ears are attached to its head? Examine the dog’s face. How does the fur grow around its muzzle? Do you notice any places where the growth pattern changes direction? Take copious notes as you analyze the photographs. You’ll refer to them over and over again whilst you are stitching.
And speaking of stitching…
Before you can get started, you’ll need to choose a thread.
One of my favorite threads for the long and short stitch is Bella Lusso crewel wool. It’s incredibly soft and the colors are beyond gorgeous. If you want to work with a multi-colored thread, take a peek at the Threadworx website to see some of their luscious hand over-dyed colors of crewel wool.
The number of strands that you’ll use will depend upon the canvas mesh size. If you’re working on an 18 mesh canvas, begin with two strands. If you’re working on a 13/14 mesh canvas, start with three or four strands. Add or subtract one strand at a time until you get the look you’re trying to achieve.
And remember to practice on a doodle canvas first. I recommend that you purchase a skein or two of thread just to practice with – especially if this is your first attempt at using the long and short stitch on a project.
Alrighty – back to using the long and short stitch to create a painterly effect on your canvas.
When your goal is to create realistic looking fur, as on our example canvas, your stitches will need to be placed randomly, rather than precisely following a stitch diagram like the one I shared in part 1 of this series.
If the thought of random stitching makes you feel like you’re going to break out in hives, I want to reassure you that it’s easier than it might seem. Getting started is the hardest part. Once you work a few rows, you’ll begin to get the hang of it and, before you know it, you’ll be creating a furry coat any pup would be proud of. 😉
So, exactly where do you start?
Great question! Remember those notes you took? Grab them – and your traced design – and draw in arrows to indicate the direction the fur grows – like I did in the picture below.
Then, choose a section and, starting at the top, work a single row of fur. Keep in mind that these stitches are random, so you won’t make them all the same length. And it’s okay to stitch outside of the painted area a little bit. Remember, animal fur sticks out some. 😉
And here’s a tip for you… I usually work the background first when I’m employing the long and short stitch on the focal point.
Stitches should be irregular in length – from ⅜” to ¼” long – and they should be staggered across the area.
Adjust the angle of your stitches to fit within the space. The angle does not have to be the same with every single stitch, either. In other words, one stitch may be executed over 1 vertical and 4 horizontal canvas threads while the next stitch you place could be worked over 2 vertical and 7 horizontal canvas threads.
Adjust your thread color as you encounter changes in the color on your painted canvas. (You might even do some needle blending to create subtle shading.) And rest assured – there’s really no “right” way to utilize the long and short stitch when working it randomly to create lifelike fur (or hair, or feathers, or flower petals).
Okey dokey, my friend… thank you, ever so much, for dropping by to read this week’s blog post. I can’t wait to see how you use the long and short stitch on one of your projects, so be sure and tag me (@serendipityneedleworks) when you share pictures on social media.
That’s all for now, so until next time – happy stitching!!
XOXO!


I missed seeing your column in the most recent issue of Needlepoint Now. I hope that you will be continuing your most informative and inspiring column in future issues of the magazine.
Hi Ann Marie
Thank you so much for taking the time to write. I’ve had to step away from writing for Needlepoint Now for the time being, but I hope to return to writing my column in the not too distant future. (My mother is not well and I’m her primary caregiver.)
In the meanwhile, I hope you’ll continue to follow me here on the Serendipity Needleworks website. 😉
XOXO!
Ellen
Hi Ellen,
I was recommended to use the long and short stitch to make clouds. I found this post while trying to figure out how to do it. They are “rounded” clouds versus straight wispy ones. I was also told to make the stitches on an angle. Do you agree with this idea, or would you recommend a different stitch.
Thank you
Hi Noel
Thank you for your question. It’s hard to make a recommendation without seeing your canvas. If you want to send me an email with a picture of your project, you can do that here.
Have a terrific day and I look forward to hearing from you soon…
XOXO
Ellen