
I’m super excited about this week’s topic – using long and short stitches to create painterly effects on your canvases! If you’ve ever wanted to stitch realistic looking animals or birds, you’re in the right place. And that goes for creating lifelike flowers and water and sky, too – just about anything that begs for some degree of shading.
The long and short stitch technique…
is also sometimes referred to as silk shading, soft shading, needle painting, or, my favorite – thread painting. It’s primarily a freestyle surface embroidery technique, but we needlepointers can employ it on our projects, too.
Before you can successfully achieve natural looking directional shading on your needlepoint canvases, you’ll have to master the basics of the long and short stitch.
Here’s step 1…

Notice how the stitches in this first row are of varying lengths? This is your “base row” and it serves to establish the long and short pattern. This is the only row where the length of the stitches varies distinctly.
A general rule of thumb is to make sure that your short stitches are approximately ⅔ the length of the long stitches.
Why, you ask? Because you don’t want your short stitches to be too short since each following row will partially cover the previously worked row.
Now, let’s take a peek at the subsequent rows you’ll need to work in order to cover the remaining area on your canvas.
Remember, you established the pattern in your base row (step 1), so all of your stitches moving forward should be the same length as the long stitches in the first row.
When working these successive rows, you may choose to have the stitches share holes or you may opt to split the stitches in the previous row.
Here’s the diagram for the long and short stitch when the stitches share holes…

Personally, I think splitting stitches results in more desirable shading, though.
When working the long and short stitch in surface embroidery, common practice is to bring your needle and thread to the front of your work so that you split the stitches of the previous row in that first motion. In other words, bring your needle to the front through the ends of the stitches in the first row, splitting them approximately ¼ to ⅓ up from their bottoms. Then, to complete the stitch, take your needle to the back in an open area of the ground fabric.
This is the way I execute the long and short stitch on my needlepoint projects, since my background in surface embroidery strongly affects my needlepoint techniques. 😉
But, you will often see needlepoint stitch diagrams that illustrate the subsequent rows of long and short stitch worked from a clean hole into the existing stitch.
(A clean hole is one in which there is no other thread/stitch already resting.) And you can absolutely do it that way! In fact, if you’re new to the long and short stitch, I highly recommend using this method to get your feet wet.
Here’s a diagram for this alternative method to working step 2…
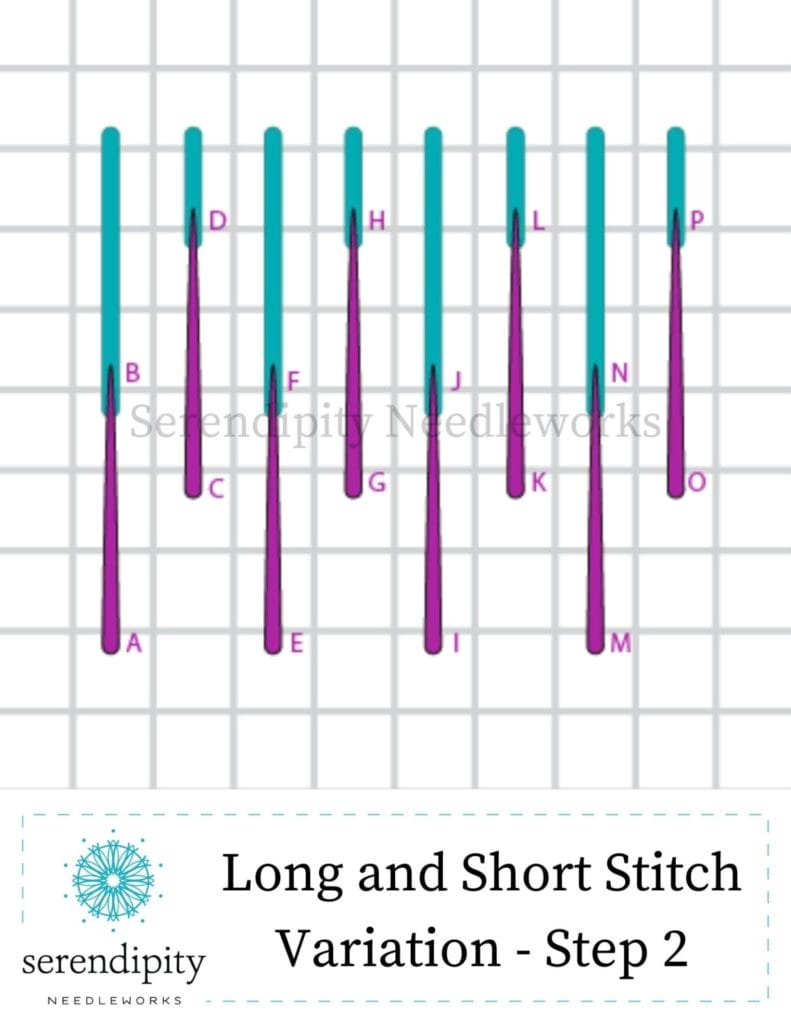
The new stitches you execute actually become extensions of the previously worked stitches.
And here’s a little tip for you: as you learn the “ins and outs” of long and short stitch, you may find it helpful to work into the short stitches first. Then, go back and fill in the long stitches.
Of course, you know I’m going to suggest that you try all of this out on a doodle canvas. You might even dedicate an entire doodle canvas to the long and short stitch. Draw different shapes, try different threads, and just have fun!! As with most things in life, “practice makes permanent“. If you want to perfect your long and short stitch technique, you’re going to have to spend time honing your skills. 😉
In the beginning, it may look like you have large rigid blocks of stitches…
instead of the subtle implied movement that you were expecting to see – and that’s completely normal!! As you’re working, keep in mind that some of the length of the stitches in each row will be lost when you work the next row. Be careful not to make your stitches too short and you’ll be golden!
Okey dokey, my friend – it’s time for you to get out your doodle canvas! Set aside some time to practice because, next week, we’ll delve into how you can add directionality to the long and short stitch to make realistic looking feathers, fur, and flower petals!
Have a terrific week and I’ll see you again soon.
Until then, happy stitching…
XOXO!!


this is really helpful – I’m about to start a little gift project with a cat in it. Do you have a video to go with this?
Hi Georgia
Thank you for your sweet note. I’m so glad you found the info helpful. Be sure to check out the next blog post (coming Sunday, May 7) for more info. There are videos for how to execute the long and short stitch in the How-To Stitch Library in The Stitcher’s Club member portal. Please send an email to [email protected] if you need help finding them. Tory will be glad to assist you.
XOXO!
Ellen
Hi! is long stitch long point? and is tradional needlepoint short point? Please let me know! Denise Marie Kellogg-Diamante
Hi Denise
It’s so nice to hear from you. I’m happy to help. Long point uses long stitches to create images on canvas. Traditional needlepoint can be classified as either petit point or gros point. You can learn more about both on my website HERE.
Happy stitching…
Ellen
I’m looking for a very flat short long, where finished product is shinny and hugs the fabric for French monogramming. Instead of coming up and doing a split stitch I come up in white space between stitches. Is there a problem doing it this way?
Hi Dana
I’d have to see pictures of what you’re talking about to be sure I’m giving my best advice. If you’d like to send some pictures in, I’ll be glad to take a look.
XOXO
Ellen