
Hi there! I hope you packed your warmest parka and plenty of snuggly sweaters because we’re headed even deeper into the icy Arctic Circle this week. Hop aboard the Serendipity Express with me and let’s take our magical virtual vacation train to the third stop on our 2019 Winter Threadventure…

Icy Lapland!

(Good golly, Miss Molly – that was fast!)

Yep – you’re reading that right! We’re still in Lapland, but today we’re crossing over into Swedish Lapland. I know – it’s a wee bit confusing that there are two Laplands, so I’ll fill you in on a few details.
You see, way back in 1809, the Russian Empire decided they wanted the eastern portion of the Swedish kingdom for themselves, so they annexed it and created the Grand Duchy of Finland. (A duchy is the territory of a duke or duchess.) And what that effectively did was divide Lapland into two areas – Swedish Lapland and Finnish Lapland. (Both of those entities still exist today. Click here to read about Finnish Lapland.)
The Grand Duchy of Finland was granted autonomy (which means that they self-governed) as part of the Russian Empire – until it collapsed during the Russian Revolution. Modern Finland evolved into its current republic form of government shortly thereafter, with intermittent interference from the Soviet Union during World War II.
And Sweden, well it’s just a little smaller than it used to be.
Now, back to our tour of Swedish Lapland…

Nearly one-fourth of Sweden’s landmass is in Lapland, but there aren’t many people living there.
There are plenty of wide-open spaces to explore, though: forests, rivers, lakes, and glaciers. And speaking of glaciers, whaddya’ say we take a peek at one of the frozen features of Lapland…

This week’s stitch, the diamond pavilion stitch, is a terrific option for icy lakes and rivers.
The diamond pavilion stitch is a straight stitch so that means you’ll need to use thicker thread to ensure full coverage if that’s the look you’re trying to achieve.
For example, you might add a couple of extra strands when working with stranded silk. Or, you could use a thread that’s heavier weight than the one you would normally use, like Silk and Ivory on 18 mesh canvas.
Let’s take a peek at the stitch diagram. Pay attention to the numbering system and remember, the stitch diagram is your road map to success with any decorative stitch.
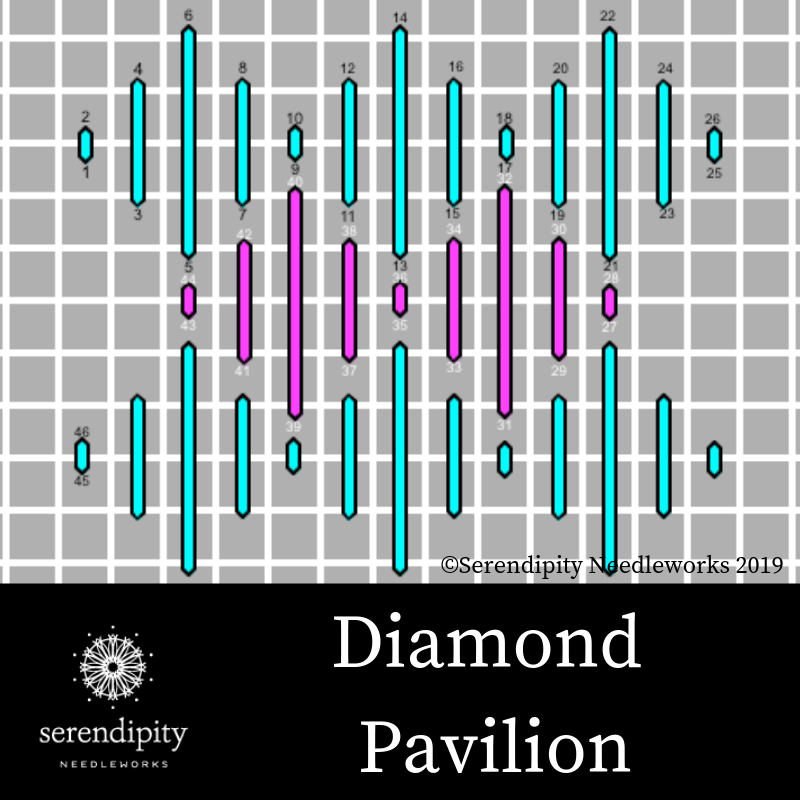
Begin on the left edge of the area you want to cover and work your way across in a horizontal row. When you get to the end of the row, drop down and work your way back across the row from right to left. Continue until you fill the area you wish to cover.
The diamond pavilion stitch is a medium-size stitch so it’s better for medium to large size canvases. It’s also a terrific background stitch. You might hear people call it the Hungarian diamond stitch, too.
I’m using Water n’ Ice to work this stitch.
Water n’ Ice is a loosely braided translucent ribbon-type thread from our friends at Rainbow Gallery. It’s 100% nylon and is available in 18 colors. Some of the colors are quite vivid – and perfect for Halloween or Christmas pieces. Each card holds 10 yards. I recommend using it for long stitches on 13 – 18 mesh canvas.
While Water n’ Ice can be a little finicky to work with, it’s well worth the effort – especially on painted canvases where you want the color to show through. It’s particularly effective for water, ice, mirrors, glass, dew drops, and frost.
It has a tendency to fray, so use Fray Check or a Thread Zap to treat the ends. You should also use short pieces. I recommend that your strands be no longer than 15″.
I’m using one strand of Water n’ Ice (WT12) in a #22 tapestry needle to work my stitch sample on a piece of 13 mesh needlepoint canvas.
Use a laying tool to lay your thread smoothly on the surface of your canvas for the best effect.
I’ve had so much fun sharing this icy stitch/thread combo with you!
We’ve had quite a busy day, so whaddya’ say we settle into our room at the Ice Hotel for some shuteye…
Pretty cool, huh? (tee hee!)

Be sure and tell me how you might use the diamond pavilion stitch or Water n’ Ice on one of your needlepoint canvases.

I love hearing from you and I read every single comment, so don’t be shy.
Until next week, happy stitching!
XOXO!!!


PS: I’ll share pictures of my stitched samples over on the Serendipity Needleworks Facebook page and on Instagram, so be sure and follow me there.
PPS: Are you on our Serendipity Needleworks NeedleNotes list? That’s where we share tips, ideas, events, and cheer each other on and I’d love to have you join me, so click here to subscribe. I’ll see you there! 😉


This would be fun to use for a waterfall
That would be lovely, Mary Lou! 🙂