
Bluebird skies with wispy white clouds…
that’s what we’re gonna take a peek at this week. Well, actually, it’s the clouds that we’ll be shining the spotlight on here. I just love wispy white clouds, don’t you? Especially when they’re floating up there in a bright blue sky like the one you see in the picture below.

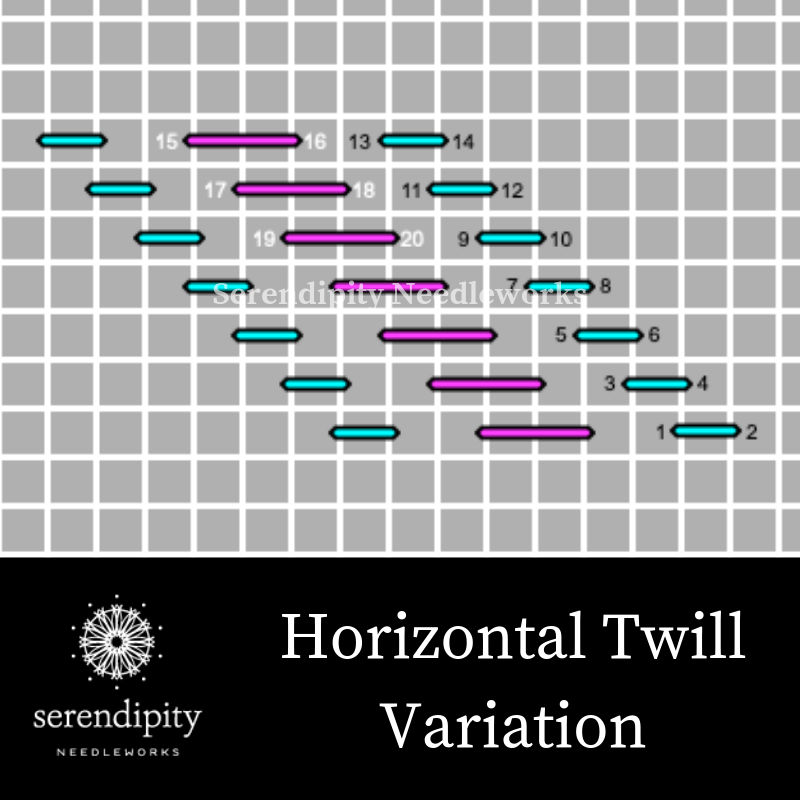
I first saw this week’s stitch in a book called Stitch Landscape by Little Shoppe Canvas Company. I use it all the time for clouds. It doesn’t have a name, but it’s very similar to the twill stitch when you turn it on its side, so I’m calling it the horizontal twill variation.
I think it’s particularly good for stitching clouds like those on this canvas by Melissa Shirley Designs…

The horizontal twill variation stitch is really simple. It’s a smallish size stitch but it requires a fair amount of space to establish the pattern repeat. (Remember, if you can’t fit three repeats of the pattern in an area, the stitch is too large.)
It’s also a straight stitch, so you’ll need to use thicker thread (or more strands) than you normally would use if you want full coverage.
For example, 5 – 6 strands of Splendor on 18 mesh canvas would work very well. Or you could use all three strands of Watercolours on 13 mesh. Always use a laying tool when using multiple strands of thread. Straight stitches like this one are much prettier when all of the strands of your thread lay smoothly on the surface of your canvas.
Use the diagram above as your roadmap for executing the horizontal twill variation.
Start at the bottom right edge of the area you wish to cover and work the first blue vertical row. Work each straight stitch over two canvas threads. When you get to the top of the area you’re covering, it’s time to work your way back down the pink row. This time, though, you’ll work the stitches over three canvas threads.
Oh – and did you notice that there’s a canvas thread between the vertical rows of stitches? That allows the artist’s beautiful shading to show through. And if you want even more of the painted canvas to be visible beneath your stitches, use a lighter weight thread than what you’d typically use on that size mesh canvas.
Now, whaddya say we take a peek at some threads…
You already know that you need to use thicker thread (or more strands of thread) if you want to achieve full coverage on your canvas. And if you want to let some of the artist’s shading peek through your stitches, you can use just about any type of thread you want.
Some of my favorite threads for clouds are…
- Wisper
- Splendor
- Watercolours
- DMC Cotton Embroidery Floss
- Vineyard Silk
- Threadworx Overdyed Floss
- Bella Lusso + Wisper
If you’d like to watch me demonstrate the horizontal twill variation, be sure and tune in to this week’s episode of Serendipi-TV on Thursday afternoon at 3:00 p.m. CDT. I’ll be broadcasting live from the Serendipity Needleworks Facebook page.
What’s your favorite stitch for stitching the clouds on your needlepoint canvases?
I’d love to hear from you – and I’ll enter your name into the drawing for a fun prize if you share it with me in the comments box below.
Sound good? Terrific! I can’t wait to hear from you. (I’ll announce the winner on May 7th.)
Until next time, happy stitching!
XOXO!!!❤️

PS: I have a couple of spots left in my retreat that’s happening this July. Click here to learn more about it.
And if you have any questions, please reach out. I’ll be happy to hop on the phone and chat with you about it.


I sometimes use a skip tent stitch for clouds and sky to permit the painted canvas to show through yet provide a “fluffy” look. I’ve had lots of compliments on the way this looks – it also works very well when there are many different colors of sky or sunset/sunrise painted on the canvas – to let them all show through.
Thank you
Hi Pam!
Thank you so much for sharing your tip. You’re right – allowing the shading on the canvas to show through open stitches is very effective. You’ll have to share some pictures of your work on my Facebook page. We’d love to see them. 🙂
XOXO!
Ellen