
So, what, exactly, are laying tools? That’s a terrific question! Technically, they’re tools that you can use to help lay your stitches smoothly on your canvas. But, basically, they’re sticks.
Laying tools are especially helpful when stitching with multiple strands of thread or when using ribbon.
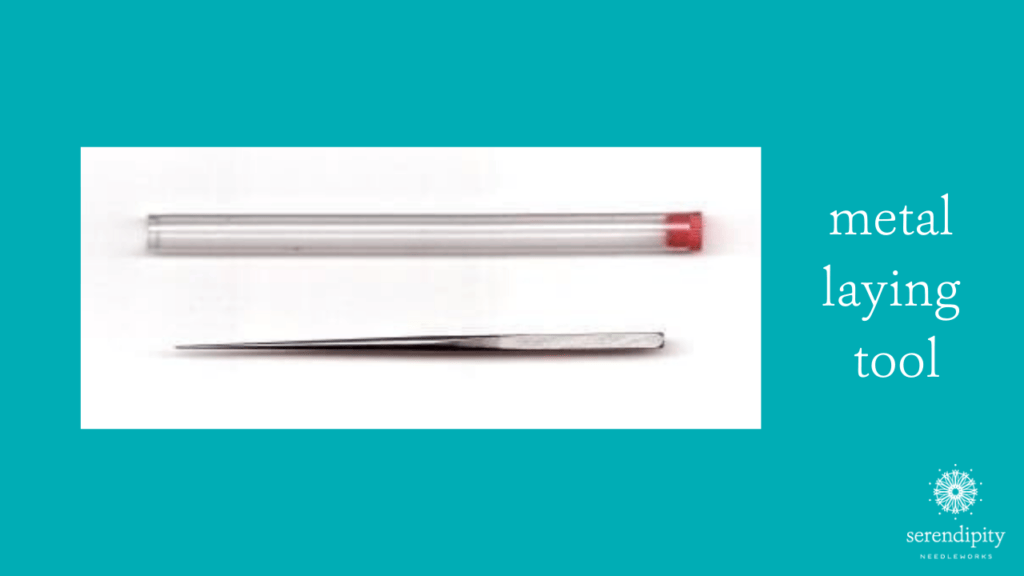
Laying tools can be made from almost any material, including wood (my personal favorite!), metal, bone, glass, plastic, even African porcupine quills! (Don’t worry – no harm comes to the critters…they shed their quills naturally.)
The most important feature of a laying tool is that it be very smooth. Why? Because you don’t want your threads to get snagged or caught on rough spots on the tool – that defeats the purpose of using one. (If you want to watch me demonstrate how to use one, be sure and read all the way to the end of this blog post to find out how you can do that.)
Wood laying tools are very popular and relatively easy to find.
They have either a pointed tip or a blunt (or more rounded) tip. I have both kinds in my toolbox.

Laying tools with pointed tips are particularly useful when you find that you need to manipulate the threads after your stitch is completed.
Blunt laying tools are especially useful if you’re working with silk ribbons since they aren’t as likely to pierce your ribbons.
There’s also a very popular laying tool called the BLT (best laying tool).
It’s incredibly sharp and has 4 sides so it doesn’t roll in your hand. (It can also be dangerous if not handled carefully). It’s great for working with multiple plies of silk thread. And it can be used as an awl – to make an existing hole larger. I use mine primarily for surface embroidery.
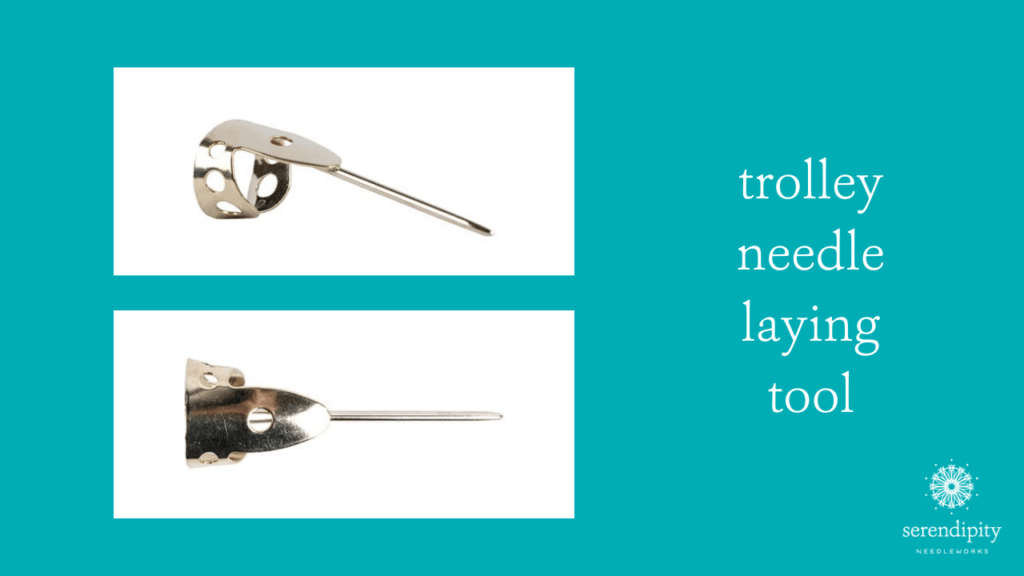
And, finally, there’s a gadget called a Trolley Needle.
You wear it on your index finger (or thumb) on your non-dominant stitching hand. When you look at it closely, you’ll see that it’s simply a tapestry needle (minus the eye) that’s been welded to a metal finger guard.
Like the “BLT”, the trolley needle is a handy gadget to have in your needlepoint toolbox, but it can be dangerous. Be very careful not to poke yourself in the eye with it. I know it sounds kinda funny, but don’t laugh. It can really be a hazard because it’s easy to forget you’re wearing it.
Now, how do you use these little gems?
Let’s take a closer look…
First, you’ll need both hands when stitching and using a laying tool.
- Mount your canvas on a scroll frame or stretcher bars and install it on a stand of some sort.
- If you’re using a laying tool to lay multiple strands of thread on the surface of your canvas, bring your needle to the front of your canvas like normal. Holding the laying tool in your non-dominant stitching hand, gently press the thread down on the canvas.
- Next, slide the tool along the thread. This stroking action will make it lie down nice and straight. It will also spread the plies out a bit which will make them cover better.
- Leaving the laying tool on the thread, go ahead and finish your stitch, making sure that you use the tool to guide the thread as you work.
- Slip the laying tool out at the last moment to allow the threads to lay snugly against the surface of the canvas.
You can also use laying tools to ensure that ribbon type threads lay smoothly on your canvas.
Fyre Werks, Neon Rays, Neon Rays Plus, Sparkle Rays, Petite Sparkle Rays, and silk ribbon are examples of ribbon-type threads that you’ll find yourself using over and over again on your needlepoint projects.
Use the laying tool basically the same way that you’d use it if you were stitching with multiple plies of silk or cotton floss, with the only difference being that you only have one strand of thread to manage.
And that, my friend, is a primer on how to use laying tools.
Be sure and leave any questions you may have in the comments box below. As always, I’m happy to help.
If you’d like to watch me demonstrate how to use a laying tool, be sure to check out the Serendipity Needleworks YouTube channel to watch the episode.
Alrighty, that’s all for now, my friend.
Until next time, happy stitching!
XOXO!

PS: Are you on our Serendipity Needleworks NeedleNotes list? That’s where we share tips, ideas, events, and cheer each other on and I’d love to have you join me, so click here to subscribe. I’ll see you there! 😉


You could also use a toothpick. I used them when I was doing appliqué when an edge just didn’t want to go under or, with a tiny touch of Fray Check, to make it stay under long enough to get a stitch in.
Anne
That’s a terrific idea, Anne! Thank you for sharing it with us.
XOXO!
Ellen
I just ordered a porcupine quill laying tool, as I only have the BLT, and I know I have to put that into my checked luggage when I travel. Hoping the quill will make it through the TSA check on my next flight. The bamboo skewer is a great tip if you forget to pack one!
Hi Lorraine!
Thank you for your note. I can’t wait to see your new porcupine quill laying tool. Be sure and share a picture with us in The Stitcher’s Club Community – and in the Facebook group, too. 😉
Glad you like the bamboo skewer idea. Another thought is a cocktail swizzle stick…
Happy stitching…
XOXO!
Ellen
I once used a chopstick! Worked just fine.
Great idea, Jane! I’ve never tried a chopstick, but I do have experience with bamboo skewers… teehee! 😉
Thank you for taking the time to share.
Happy stitching!
XOXO!
Ellen
When flying I left mine in the checked bag and found that the stir stick on delta was smooth so I asked for a clean one to use. I kept the rest from the trip, washed them and left in my togo kit. I have a small zippered bag that has a pack of needles, a threader, small scissors, and laying tool. I can grab the bag with the threads and canvas and go.
Wow! Those are great ideas, Jeri! Thank you so much for sharing them here with us! I need to create an extra “to-go” kit for myself.
Happy stitching!
XOXO!
Ellen