
Hi there!
Are you ready for this week’s stop on our encore Threadventure tour? Hop aboard the Serendipity Express with me and we’ll take our magical virtual vacation tour bus to our next stop – the magnificent Grand Canyon! We’re expecting beautiful blue skies during our visit, so you’ll be able to see nearly two billion years of Earth’s geological history that have been exposed as the Colorado River and its tributaries cut their channels through layer after layer of rock. Pretty amazing, huh…

And here we are!

The Grand Canyon is a wondrous place! The canyon, itself, is 277 miles (446 km) long, up to 18 miles (29 km) wide at points, and is over a mile (6,093 feet or 1,857 meters) deep in some places.
But it’s those magnificent skies – especially at sunrise and sunset – that we’re going to take a closer look at here today.

The Moorish stitch is a super-terrific needlepoint stitch for skies.
The Moorish stitch is a “combination” stitch and that means two (or more) stitches combine to create a new stitch. Scotch stitch and tent stitch pair up, in this case, to create a combination that has a very definite diagonal directionality. The Moorish stitch is really fun to work and it’s not a hard stitch to execute.

Begin by working the diagonal rows of the Scotch stitch. Start in the upper right corner of the area you want to cover on your canvas. Use the diagram above as your roadmap. After you complete all of the diagonal rows of Scotch stitch, simply fill in the gaps with tent stitch. Easy peasy, right? 😉
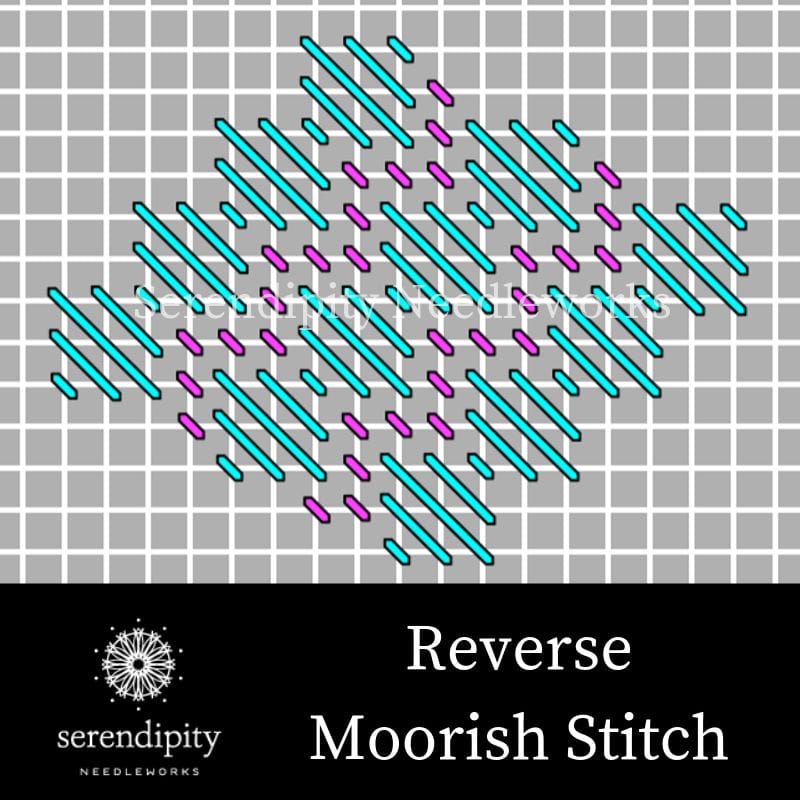
And remember – you can always alter the slant of your stitches to infer a different direction…
For example, if the clouds on your canvas are painted in a leftward slanting direction, you could reverse the direction of your diagonal Scotch stitch rows and have them slant toward the left, too. In this case, you’d begin stitching in the left upper corner of the area you want to cover with the reverse Moorish stitch. Here’s a stitch diagram for you to help you envision what that looks like…
I’m using Watercolours to work the Moorish stitch.
Watercolours is making an “encore” appearance this week. Click here for info on this fantabulous thread from The Caron Collection.
I recommend using 1 strand of Watercolours on 13 mesh canvas for light coverage, so you can see the artist’s shading peeking through. You can also use 1 strand of Watercolours on 18 mesh, but you’ll get heavier coverage.
If you’re looking for light coverage on 18 mesh canvas, try using Waterlilies from The Caron Collection. Waterlilies is a 12 strand divisible silk thread. Many of the colors available in Watercolours are also available in Waterlilies. I recommend using 2 – 3 strands of Waterlilies for light coverage on 18 mesh canvas.
And that, my friend, that brings us to the end of our time at the Grand Canyon.
It’s been so much fun to share this fun needlepoint stitch for skies with you!

Now, let’s hop on board the Serendipity Express and hit the road to our next destination…
glitzy Las Vegas!
Until next time, happy stitching!
XOXO!!!

PS: I’ll share pictures of my stitched samples over on the Serendipity Needleworks Facebook page and on Instagram.


I cross stitched for years and am recently new to needlepoint. I took a couple lessons at a local needlepoint shop and then COVID so that put a damper on that. What I find most challenging is “compensating” for the area the stitch goes in. On a broad, open block I have no problem executing a stitch but try to make that stitch fit in the artist’s painted area on the canvas and i am lost and frustrated. Can you advise me?
Hi!
I’m happy to help. The best suggestion I can give you is to remember that, when compensating, you’re adjusting the length of the stitches to make them fit into the prescribed space. It’s a good idea to work the full stitches first, then go back and fill in the compensated stitches at the end. The only exception is when working with multicolored threads. You’ll need to do the compensating as you stitch along in order to keep the flow of color intact. I hope this makes sense. 😉
Have a terrific rest of your day and happy stitching!!
Ellen