
Ready to dive into some stitches that you can use to embellish your needlepoint canvases? Terrific! Me, too. Let’s chat just a minute about stitch families before we get started, though. When you understand how stitches are grouped in families (and how those families relate to each other), it helps make choosing the best ones for your projects much easier. I like to categorize canvas embroidery stitches into these five families: straight, slanted, crossed, looped, and knotted.
- Straight stitches are those that lay either in a horizontal or vertical direction on your canvas.
- Slanted stitches are those that form an angle – between 0 and 90 degrees – on the surface of your canvas. (Included in the slanted stitch family are both true diagonal stitches and oblique stitches.)
- Cross stitches are exactly what they sound like – stitches (either straight or slanted) that cross each other.
- Looped stitches are those that incorporate one or more loops of thread as part of the pattern and execution.
- Knotted stitches are those in which the thread is knotted around itself.
What about all those other stitches that don’t fit into one of these families? Well, they’re likely combination (or composite) stitches or surface embroidery stitches.
Today, we’re gonna look at straight stitches.
Remember, straight stitches lay either horizontally or vertically on your canvas. And you’re gonna want to click here to read my most recent blog post about texture before you go any further – so you can catch up and be ready for where we’re going today. 😉
Alrighty – let’s dive in!
The easiest way to illustrate is by examining a canvas. Look at this adorable sunglasses case by Colors of Praise Designs. It’s a simple design without a lot of shading – and that’s exactly the kind of canvas I recommend for stitchers who are new to choosing stitches and threads for their projects.
Oh – and I have to mention that I wouldn’t finish this canvas as a glasses case if I actually stitched it using the threads and stitches I’m recommending here. Instead, I’d have the canvases finished as a decorative stand-up for a sideboard or mantle.

Let’s get started by identifying the design components…
- sand
- water
- sky
- clouds
- beach cabana (including the window, railing, and flag)
- beach ball, umbrella
- the shadow on the sand
- colorful stripes.
For our purposes here, we’ll narrow our focus to just four components: sand, water, sky, and clouds.
Our next step is to make lists of descriptive words for each of those design components. After those lists are created, it’s time to begin brainstorming thread possibilities. And, of course, you can begin browsing through stitch books, too. Since we have a limited amount of time, whaddya’ say I share some of my favorite straight stitches with you. You can definitely use them on this canvas, or on any canvas featuring similar design components.
We’ll start with the simplest of all straight stitches – the Gobelin stitch.
You can execute it either vertically or horizontally. I prefer to work it over from two to six canvas threads.
The Gobelin stitch is a terrific choice for the sand on this canvas. Why? Well, when you pair it with an overdyed thread, like Watercolours, the simplicity of the stitch allows the thread to do all the work. In fact, it’s the subtle shift of color on the thread that conveys a sense of depth and movement.
And then there’s perspective. Since the sand is in the foreground of the design, you can adjust the size of the Gobelin stitch to fit the space. In other words, you can choose to execute it over a larger number of canvas threads so that the viewer feels like the sand is closer than the water.
Here’s a diagram of the Gobelin stitch for you…
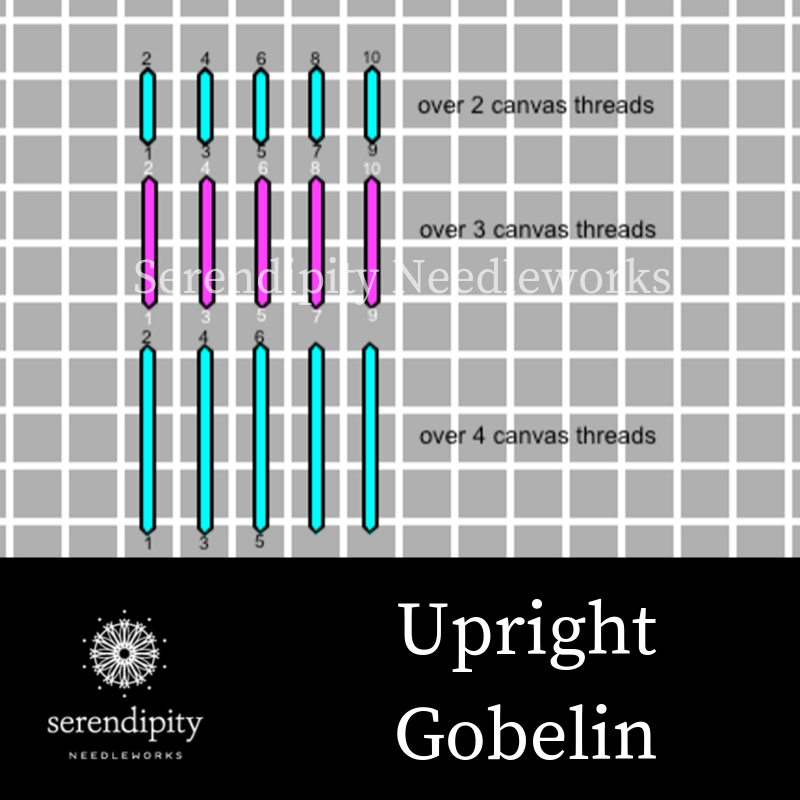
Think of a stitch diagram as your roadmap. Use the numbers as your guide for where to place your needle (bring your needle to the front of your canvas on odd numbers and take your needle to the back on even numbers). Just follow the map and you’ll be golden!
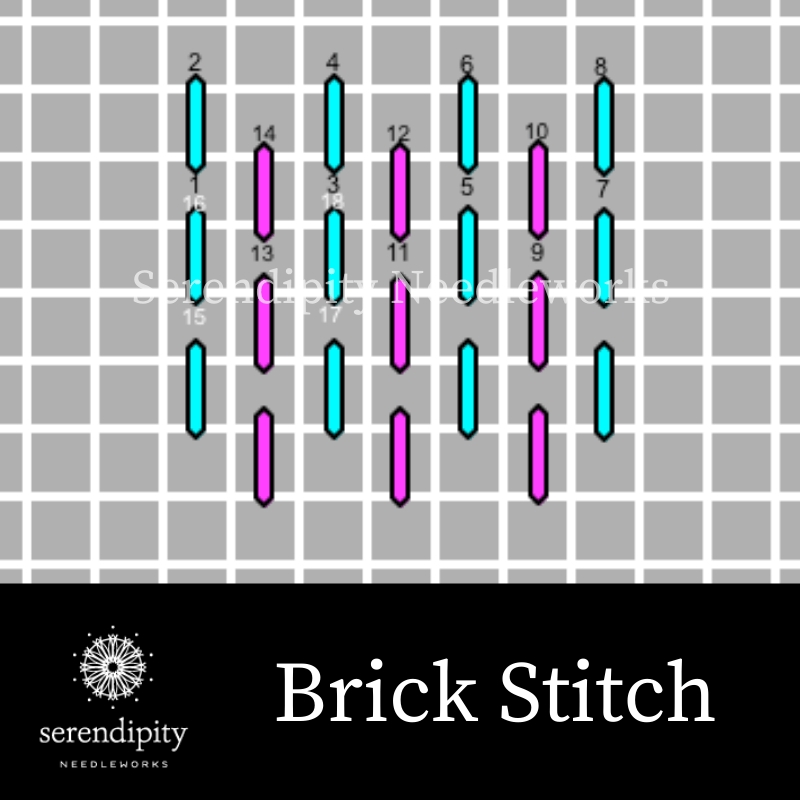
Next, let’s take a peek at the brick stitch.
You can execute it horizontally or vertically, too. It’s a relatively small stitch so you can use it in a variety of spaces. I consider it a neutral stitch, which means that it doesn’t draw your eye in a particular direction.
The brick stitch is one of my “go-to” stitches for backgrounds and it fits the bill for the sky on our beach scene canvas perfectly. Pairing the brick stitch with a beautiful shade of blue Splendor adds just enough visual interest to keep the viewer’s attention without detracting from the overall unity of the design. The smooth texture of Splendor mimics the look of a summertime bluebird sky and the small size of the brick stitch evokes the perfect sense of distance that you want to achieve for a background.
Here’s a diagram of the brick stitch for you…
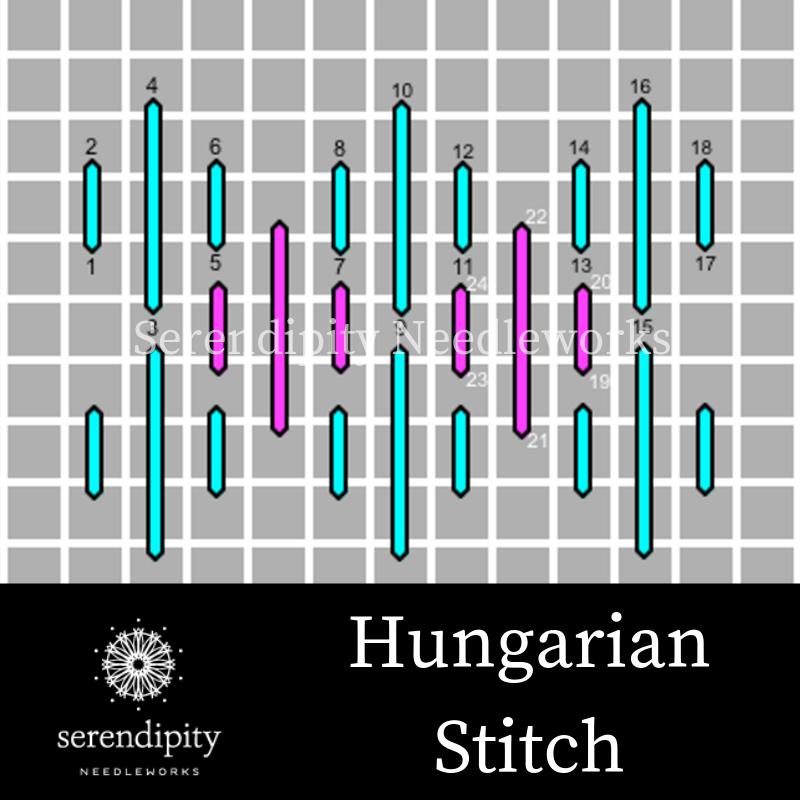
Now, let’s look at the Hungarian stitch.
This is another one of those straight stitches that you can execute either horizontally or vertically. Work short and long stitches over two and four canvas threads to create the pattern. It’s a great filling stitch which means that you can use it to fill in particular areas – like clouds – on your needlepoint canvases. 😉
One of my favorite thread combinations for stitching clouds is Wisper + Bella Lusso.
The blend results in a fluffy texture truly reminiscent of a puffy white cloud on a summer day. I like to use one strand of Wisper and one strand of Bella Lusso on 18 mesh canvas or two strands of Wisper and two strands of Bella Lusso on 13/14 mesh canvas. For the clouds on our beachy canvas, I recommend flipping the Hungarian stitch on its side and working the stitches horizontally.
Why? Because clouds glide across the horizon from left to right – or right to left – depending upon the direction of the wind. The Hungarian stitch is a slightly larger scale stitch than the brick stitch that I recommend for the background on this design, so it provides the proper perspective for our clouds, too.
Here’s a stitch diagram of the Hungarian stitch for you…
Finally, let’s dive into (tee hee! – I couldn’t resist) the stitch for the water design component on our canvas – the Florentine stitch.
You may also hear people refer to the Florentine stitch as Bargello. Work the pattern over four canvas threads that step up or down two canvas threads. You may choose to execute the Florentine stitch either horizontally or vertically. It evokes a distinct sense of movement and that’s what makes it so appealing as a stitch for water.
Pair it with a sparkly thread, like Rainbow Gallery’s Silk Lamé Braid and it mimics the look of ocean waves glinting under the summer sun. Employing the zig-zag pattern here breaks up the monotony of the vertical straight stitches used for both the sand and the sky.
Here’s a stitch diagram of the Florentine stitch for you…

And there you have it – four straight stitches that you can use to embellish your painted needlepoint canvases.
Of course, you can use these same four stitches in a myriad of ways, especially when you pair them with different threads. Let your imagination run wild – and play around with different combinations on a doodle canvas.
Next time, we’ll explore slanted stitches. 😉
Until then, happy stitching…
XOXO!!

PS: Be sure and subscribe to our YouTube Channel so you don’t miss any new episodes of Needlepoint TV™!
PPS: Are you on our Serendipity Needleworks NeedleNotes list? That’s where we share tips, ideas, events, and cheer each other on and I’d love to have you join me, so click here to subscribe. I’ll see you there! 😉


Hello! How many strands of Soie d’Alger should I use for an 18 mesh canvas?
Hi Maureen!
That’s a terrific question. It depends upon a few things… first, which stitch are you using? If using the tent stitch and your goal is complete coverage, my best suggestion is to use 3 – 4 strands. It will depend on your stitching tension, so you might start with 3. If you aren’t getting the coverage you want, add a strand. If you’re asking about decorative stitches, that will definitely depend upon the stitch and the kind of coverage you’re trying to achieve. I hope this helps – and thank you for reading my blog.
XOXO!
Ellen 🙂