
Hello there, lovely! Last week’s blog post about straight stitches that you can use to embellish your needlepoint canvases was a winner, winner, chicken dinner, so this week we’re gonna explore slanted stitches! Sound good?
Terrific! Let’s dive in…
Remember, there are five basic stitch families:
- straight
- slanted
- crossed
- looped
- knotted
Slanted stitches are those that form an angle – between 0 and 90 degrees – on the surface of your canvas.
Included in the slanted stitch family are both true diagonal stitches and oblique stitches. What’s the difference between a true diagonal stitch and an oblique stitch? Great question!
A true diagonal stitch is one that’s worked over the same number of horizontal and vertical canvas threads.
For example, a tent stitch is a true diagonal stitch that is worked over 1 horizontal and 1 vertical canvas thread. The mosaic stitch is another true diagonal stitch. Here’s a diagram for you so you can see what I’m talking about…
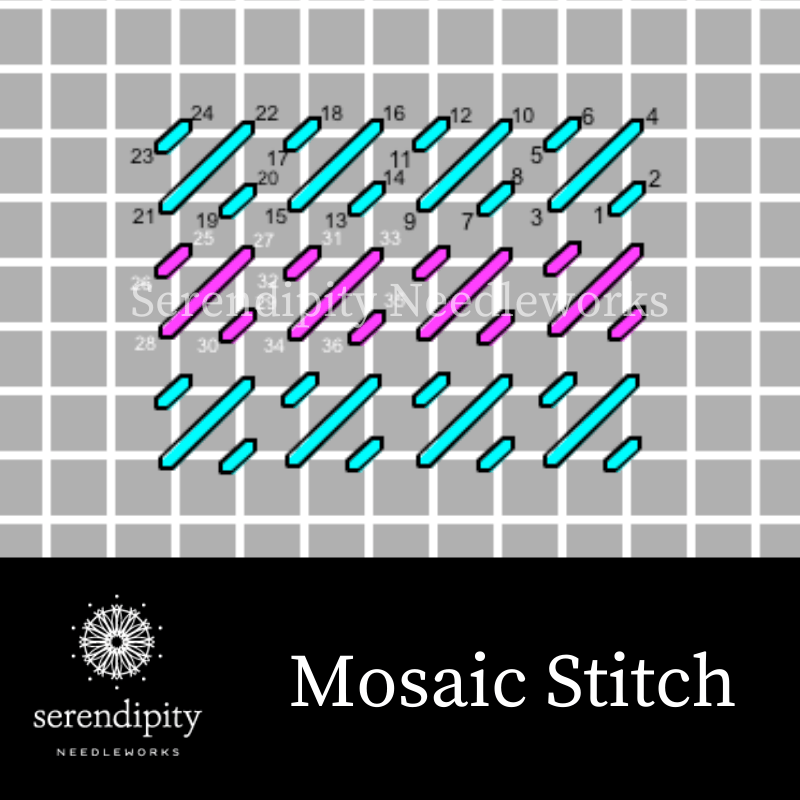
You already know that the two short (tent) stitches are true diagonal stitches. And see how the center long stitch lies across two horizontal and two vertical canvas threads? That center stitch is also a true diagonal stitch. Easy peasy, right?!
An oblique stitch is simple to identify, too.
It’s any slanted stitch that’s not a true diagonal stitch. In other words, when a stitch is worked over a differing number of horizontal and vertical canvas threads, it’s an oblique stitch. Use this diagram for the oblique Slav stitch as a visual aid and you can see how the stitch lies across two horizontal canvas threads and four vertical canvas threads.

When reading a stitch diagram, just think of it as your roadmap. Use the numbers as your guide for where to place your needle (bring your needle to the front of your canvas on odd numbers and take your needle to the back on even numbers). Just follow the map and you’ll be golden!
Ready to delve into some slanted stitches that you can use add texture, perspective, and movement to your painted canvases?
Great! Me, too.
Let’s begin by examining our canvas, “Fall Mountain”, by Julie Mar. Our first step is always to identify the design components. And this simple design features mountains (five, to be precise), trees (on three of the mountains), fog, and sky.
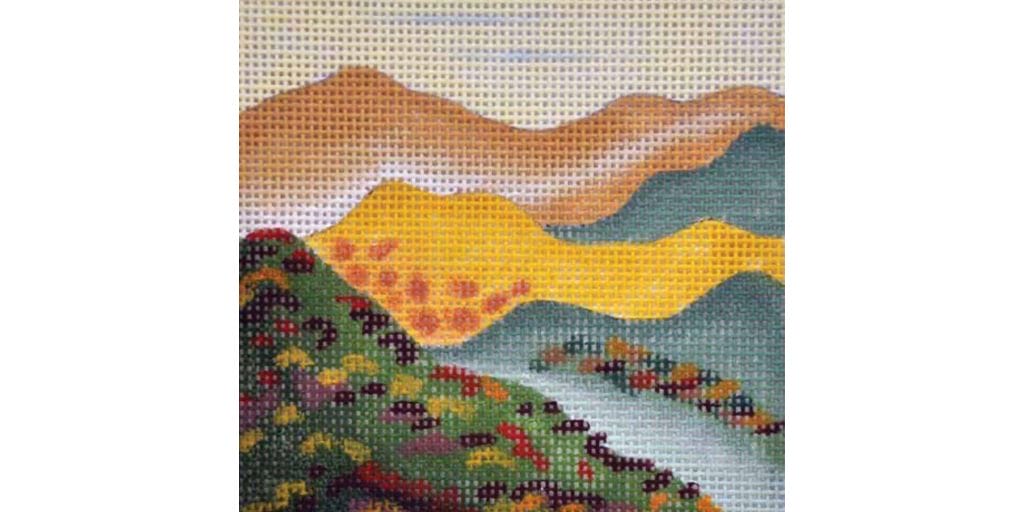
The next step is to make a list of descriptive words for each of those design components. (If you’re just joining us for this series about adding texture and movement to your needlepoint projects using canvas embroidery stitches, click here to read the first post.)
After you create your list, it’s time to begin brainstorming thread possibilities. And, of course, you can begin browsing through stitch books, too. Since we only have a wee bit of time together, I’ll share a few of my favorite slanted stitches with you. You can definitely use them on this canvas, or on any canvas featuring similar design components.
We’ll start with the oblique Slav stitch…
Typically, you’ll execute it over two horizontal canvas threads and four vertical canvas threads. The oblique Slav stitch is a terrific choice for the mossy green mountain between the two gold-colored mountains. Why’s that?
The mountain is more of a background design component, so you want it to appear as though it’s farther away than the three mountains in the foreground. Since the oblique Slav stitch is a smallish stitch – and a simple stitch – it fits the bill perfectly.
You might consider using an overdyed thread like Threadworx Overdyed Floss. Threadworx has some beautiful greens that work very well for lush vegetation. And overdyed threads are terrific choices for simple stitches. The thread does the heavy lifting, adding subtle shifts of color to create a sense of movement and texture. Can’t you just see the trees on that mountain swaying in the wind?
Next, let’s take a peek at the encroached slanted Gobelin stitch.

This little stitch is super versatile because it can be adjusted to fit in a variety of different size spaces – like the bright gold mountain in the center of our design. It’s another oblique stitch and you can alter the slant of your stitches to suggest directionality.
I recommend slanting the stitches to the left to make this mountain really stand out. (It’s the focal point of the design, after all.) And I’d use a lovely tonal overdyed thread to add depth of color, then add French knots on those dark gold splotches for texture. Maybe even do some needle blending.
Wondering how (and when) to change the size of the encroached slanted Gobelin stitch?
It’s really quite simple… all you need to do is alter the number of canvas threads over which you choose to work the stitch. If you want to evoke a sense of distance, work it over fewer canvas threads, making it smaller. Conversely, if you want it to loom large in the foreground, execute it over more canvas threads.
Now, let’s look at the Nobuko stitch.
It’s a true diagonal stitch that’s comprised of short and long stitches. The short stitch is a simple tent stitch and the long stitch is worked over three horizontal and vertical canvas threads. Use the stitch diagram below to establish the pattern in the first row, and then your fingers will fly on the subsequent rows.
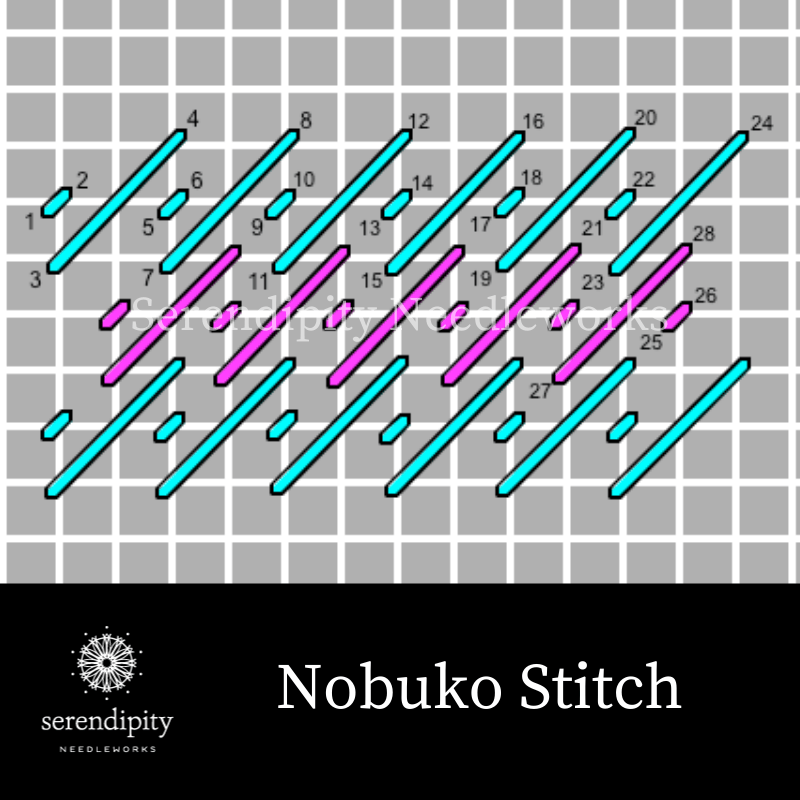
The Nobuko stitch is another smallish stitch, but it has more texture than the oblique Slav stitch or the slanted encroached Gobelin stitch. (It’s the tiny little tent stitch that makes the difference.) Since we’re working our way toward the front of the canvas – or the foreground – the stitches can get larger and have more detail.
I like the Nobuko stitch for the green mountain with the stripe of multi-colored spots. Another of my favorite threads for stitching trees, shrubs, mountains, and greenery is Watercolours. Just one strand of this beautiful hand-dyed Pima cotton thread works very well on 18 mesh canvas. Use two strands on 13/14 mesh canvas and be sure to “strand” them before you thread them into your needle.
What the heck does “stranding” mean?
That’s when you separate the individual strands of a divisible thread and put them back together again before threading them into your needle. In the case of Watercolours and 13/14 mesh canvas, simply pull two strands out individually, then put them back together and thread your needle. And voilá! You’re ready to stitch. (Remember to use a laying tool any time you’re working with more than one strand of thread in your needle.)
For the strip of colorful spots on our mountain canvas, I recommend using the diagonal mosaic stitch.
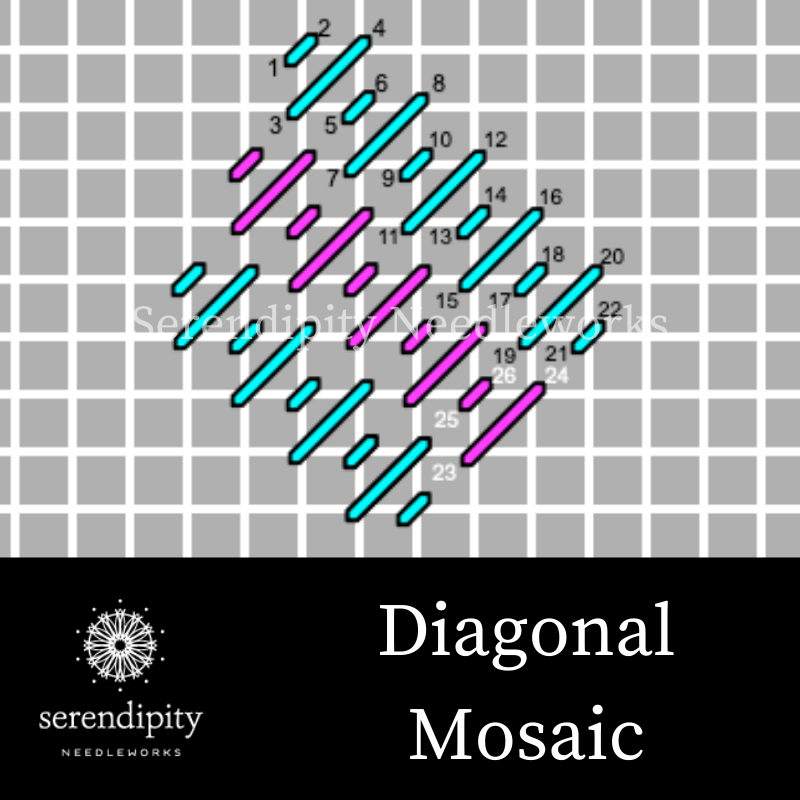
Why? Because it’s a true diagonal stitch, too, and it fits in nicely with the Nobuko stitch. (It’s also easy to compensate.) Use a multi-colored thread that features the same colors the artist painted to represent the trees. Oh – and I recommend working the diagonal mosaic stitch first, then filling in around it with the Nobuko stitch.
Finally, let’s chat about the large dark green mountain in the foreground of our design.
This portion of the canvas features vivid pops of color, but it’s not the focal point. (Remember, the bright gold mountain in the center of the canvas is the focal point.) So, how can we make the dark green mountain look really terrific without wrecking the overall unity of the design?
Have you ever heard the mantra “every piece needs a little basketweave”? Well, this is the perfect place to implement that advice. Since there’s so much color bouncing around on that corner of the canvas, tent stitch is the perfect choice for the green portion of the mountain.
Then, you can jazz things up a little by using the cashmere stitch for texture.
The cashmere stitch is similar to the mosaic stitch – it’s just a little longer. (It’s a true diagonal stitch, too.) You can work it either horizontally or vertically.
Instead of using multi-colored threads, I recommend using individual colors that match the artist’s painting. You can definitely use tonal overdyed threads for depth of color, though. Since the cashmere stitch is a little larger than the diagonal mosaic stitch, it provides the viewer with a proper sense of perspective, too. Here’s a stitch diagram of the cashmere stitch for you.

And there you have it… six slanted stitches you can use to embellish your painted needlepoint canvases.
Of course, you can use these same six stitches in a host of different ways. Just get out your doodle canvas and your thread stash – and have fun! Your imagination is your only limitation.
Next time, we’ll explore crossed stitches. 😉
Until then, happy stitching…
XOXO!! ❤️

PS: Be sure and subscribe to our YouTube Channel so you don’t miss any new episodes of Needlepoint TV™!
PPS: Are you on our Serendipity Needleworks NeedleNotes list? That’s where we share tips, ideas, events, and cheer each other on and I’d love to have you join me, so click here to subscribe. I’ll see you there! 😉


Thank you! I love this tutorial. Very helpful and just what I was looking for to plan my project. Do you possibly have photos of how these stitches look when finished? Next to each other?
Hi Michal
Thank you so much for your note. I’m tickled that you enjoyed reading the blog post. I’m so sorry, but I don’t have images of the stitches that I shared, but you could definitely do some testing on a doodle canvas with some scrap thread and test them out for yourself. 😉
I L-O-V-E trying out different stitches and threads to see how the combinations might work on my projects.
Happy stitching…
Ellen