")
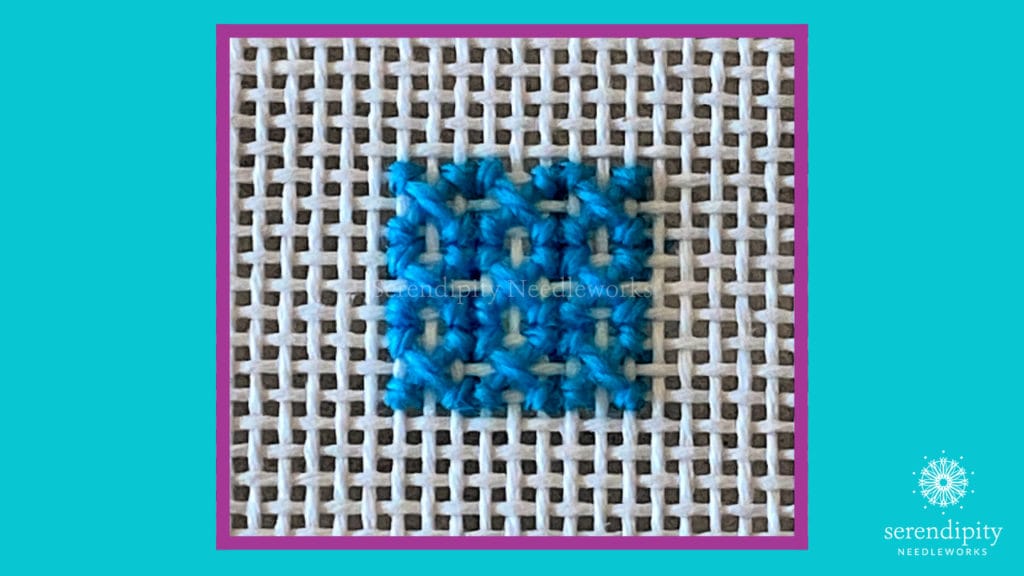
The rice stitch is one of those versatile stitches that you can use in a variety of places on your needlepoint canvases. It makes a terrific border. Some people even use it as a background stitch! The rice stitch is a member of the crossed stitch family. There are oodles of variations of this stitch.
Here’s a picture of the rice stitch for you…
Some other names for the rice stitch are
- the crossed corners stitch
- the boss stitch
- the squared boss stitch
- and the William and Mary stitch
There are two steps to working the rice stitch.
I’m sharing my diagram with you here so that you can give it a try for yourself. 😉
The first step is to work a large cross stitch over three canvas intersections as you see in the diagram below.
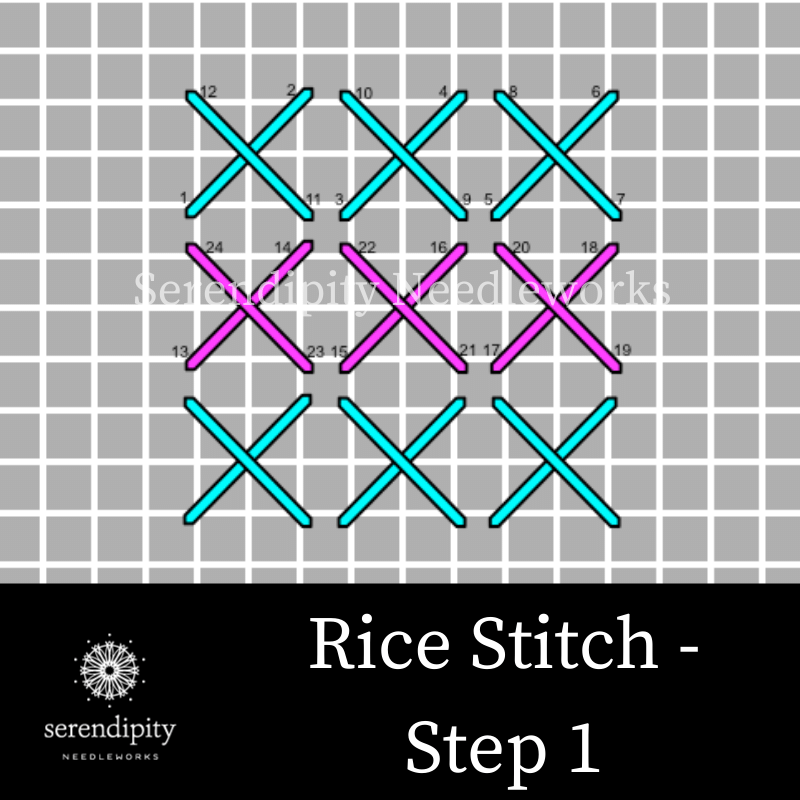
You may also adjust the size of the cross-stitch so that it lays across 2, 4, or more canvas intersections.
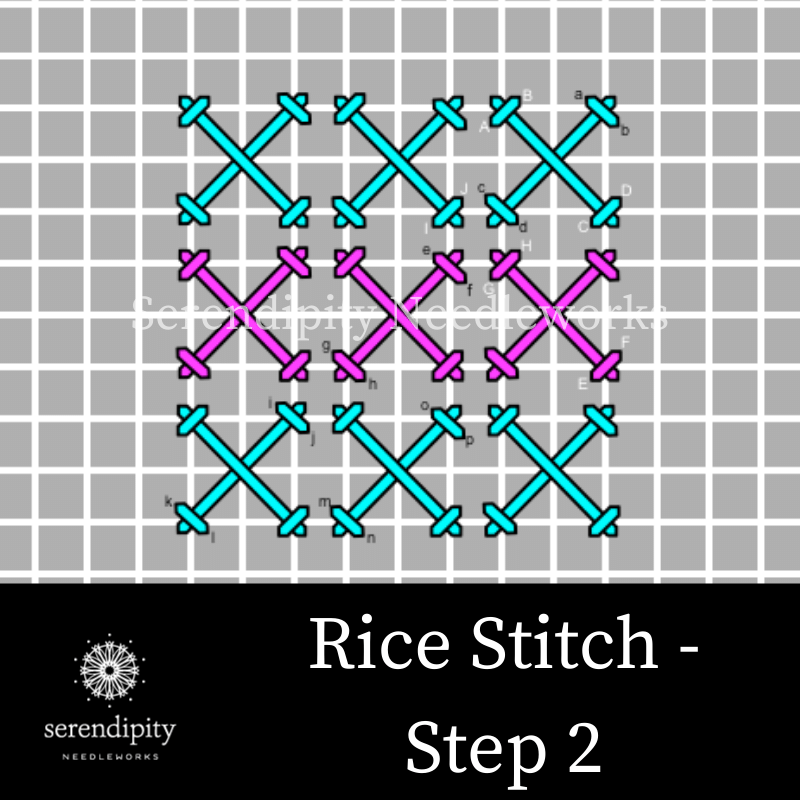
The second step is to work the tent stitches over the four cross stitch legs to form the top layer of the stitch.
Here’s the diagram for you…
When working the rice stitch, you’ll want to follow the diagram closely – except when you’re using a multicolored thread. When you’re working with over-dyed or hand-painted threads, it’s always best to complete each stitch unit before moving along to the next one in the row so that the flow of color remains intact. (This also applies when compensating the rice stitch while working with multicolored thread.)
I typically begin on the left side of the area I’m covering with this stitch since my right hand is my dominant stitching hand. If your dominant stitching hand is your left hand, begin on the right side and reverse the number sequence. Notice, too, that you’ll work the tie-down stitches in diagonal rows. (That helps prevent canvas distortion.)
Two of my favorite ways to use the rice stitch are for clothing details and snow-covered shrubs.
The beauty of this stitch is that you can completely change the way it looks by combining different threads. Since the rice stitch is a layered stitch (meaning that stitches lay on top of each other in a stitch unit), you’ll want to use lighter weight thread than you’d typically use to achieve your desired coverage.
If your goal is to create a luxurious garment, you could use silks and metallics/semi-metallics.
An exquisite combination for 18 mesh canvas would be Splendor + Petite Silk Lame Braid. Work the base cross using 2 – 3 strands of Splendor and work the smaller tie-down stitches in Petite Silk Lame Braid. Or if you’re working on 13 mesh canvas, you might use Vineyard Classic Silk for the base cross and Kreinik #12 Tapestry Braid for the tie downs.
But if you want the article of clothing to be more casual, I recommend using cotton or wool thread. There are soooo many possibilities here, too, but my best suggestion is to use just one thread to create a simpler and cleaner look. Bella Lusso, Impressions, and DMC cotton embroidery floss are terrific options for 18 mesh canvas, while Waverly Wool and Perle Cotton #5 and #8 are great for 13 mesh canvas.
You can use the rice stitch for snow-covered shrubs, too.
Use a solid or multi-colored thread for the base cross and a sparkly metallic thread for the tie down stitches. Threadworx Overdyed Cotton Floss is one of my “go-to” threads for working foliage on 18 mesh canvas. Some of my favorite colors are English Hunter, Woodland Green, and English Ivy. Use 2 – 3 strands of Threadworx Overdyed Cotton Floss for the base cross stitch. And use a single strand of Fuzzy Stuff (FZ15) or Kreinik #8 Fine Braid (#5760) for the snowy tie down stitches.
If you’re working on a 13 mesh canvas, consider using a single strand of Watercolours to work the foliage. Some of my favorite winter foliage hues of Watercolours are Evergreen, Emerald, and Moss. And you can use Glisten (G02) for the tie down stitches to mimic fluffy sparkly snow.
Alrighty, my friend, that’s all for now. If you decide to use this fantabulous stitch on one of your projects, please let me know down in the comments below. And I’d love to see a picture, so if you post one on social media, be sure and tag me (@serendipityneedleworks) or use our hashtag #serendipityneedleworks.
You might just find your picture featured on my Facebook or Instagram feeds. 😉
Have a terrific rest of your day and, until next time…
Happy Stitching!
XOXO!! ❤️


Love this. Can’t wait to use it.
YAY! I’m so glad you like it, Debbie! I can’t wait to see how you use it. Be sure to share a picture, if it’s not too much trouble. 😉
XOXO!
Ellen
Looks like a fun stitch to use, thank you for teaching it!!
So glad you like it, Judi!
XOXO!
Ellen