")
The summer travel season is upon us here in the US – and after two years of hunkering down, I’m ready to do some stitching on the go! So let’s take a peek at some of my favorite tips for traveling with your needlepoint projects…
The first thing to consider is what kind of traveling you’ll be doing.
Are you jetting off to some exotic location? Or will you be cruising the highways and byways in your car? Will your time away be an excursion with a carefully planned itinerary or will it be a carefree vacation?
The answers to all of these questions will help you determine the kind of project to pack.

If your stitching on the go includes air travel…
the Transportation Security Administration (TSA) will tell you what you can (and can’t!) take on board. In fact, when you search for “scissors” on their website, you’ll see an entire list of approved cutting devices.
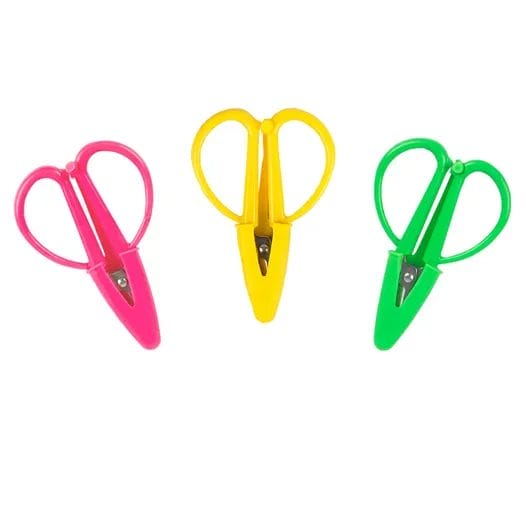
And while we’re on the subject of scissors, I recommend leaving your favorite pair at home when you take your stitching on the go. Not only do you eliminate the risk of having them confiscated by a cranky TSA agent, you also won’t accidentally lose them.
Super Snips work very well and I’ve never had them taken away. (That’s them in the picture below… aren’t they cute?!)
Here are some suggestions for traveling with your needlepoint on an airplane:
- Stick with small projects. For example, Christmas ornaments, bookmarks, belts, eye glasses cases, etc. all make terrific “plane projects”. If you’re like me and you work on a frame, keep the frame size to 10″ x 10″ – or smaller. (Airplane seats can be very snug, especially when you start stitching.)
- If your flight is going to be a long – or require multiple layovers – consider packing two or three small projects in your carry on to prevent boredom from setting in. 😉
- Domestic flights typically allow scissors with blades smaller than 4″, but international flights are anybody’s guess. It truly does depend upon the country you’re traveling to and the security agent on duty. S0 – it’s a good idea to pack a pair of nail clippers in your bag. You can use them to cut your threads in a pinch.
- Pack an extra pair of scissors in your suitcase.
- When stitching with solid colors, you can pre-cut your threads. I recommend cutting the pieces between 15″ and 18″ long.
- I like to use Floss-Away bags to store my threads. And I keep up with all of the threads for a single project by putting the Floss-Away bags on a binder ring. (See the picture below.)
- Use zippered project bags to keep all of your supplies together – and don’t forget to check the seat back before you disembark. The last thing you want to do is leave your project on the airplane. 🙁
- If you have the opportunity to pre-select your seat and you’re a lefty, try to snag an aisle seat. And if your right hand is your dominant stitching hand, opt for a window seat.
If you’re traveling with your needlepoint, but you plan to go by car…
you really can take whatever you want, as long as it fits in your vehicle. But you want to be realistic, too.
Ask yourself these questions:
- Can I stitch in the car? (If the answer is yes, what kinds of projects can you most easily work on in the space you’ll have available?)
- How much stitching time will I really have on this trip?
- Will I have time to stitch once we reach our destination? And even more importantly – will I want to stitch when we get to where we’re going? (If the answer is yes, where will you be when you’re stitching? On the porch of a cabin? On the beach? In a camp chair under the trees?)
And then, plan accordingly. Remember – it’s better to take simple projects that don’t require a lot of paraphernalia when you’re traveling. In other words, leave the stocking on a scroll frame that requires a stand to stitch at home unless you’re headed to a condo at the beach for a couple of weeks.
“Car projects” can be a wee bit larger than those you can comfortably work on in an airplane…
but I still like to keep it simple. Some of my favorite “car projects” include small pillows or pieces that will be framed, belts, Christmas ornaments, etc. Again, anything that isn’t too cumbersome.
I tend to avoid projects that require the use of a laying tool if I’m traveling by car. And 13/14 mesh canvas (or larger) is easier for me to see while I’m moving down the highway. I save the beading for at home, too. Nothing will kill your needlepoint mojo quicker than spilling an entire container of seed beads in the floorboard of the car… speaking from experience! 😉
Other Tips for Stitching on the Go
- Download audio books and/or episodes of your favorite podcasts before you leave so that you have something to listen to while you are stitching. (Or make a playlist of your favorite tunes to stitch by.)
- Google “needlepoint shops in…” (wherever you’re going) and add them to your itinerary. You never know when you might find a new shop to add to your list of favorites.
- Take extra packages of needles. I usually take a couple of packages of #22 tapestry needles with me when I travel. I keep one in my main tool bag and one in my purse (or backpack, if I’m flying).
- Take two or three small projects instead of one large-ish one. You can rotate them as your travel circumstances change.
- Put together a small transparent/translucent zippered tool pouch so that you can keep all of your essential tools in one convenient place. Include extra needles, a needle threader, Super Snips (or scissors), and a tape measure. If you’re traveling by car, you can add a needle minder, a Stitcher’s Best Friend, and any other gadgets that you like to use when stitching.
Oh – and don’t forget your readers and a travel light (or your CraftOptics glasses, if you have them).
And there, my friend, you have it… tips for taking your stitching on the go. If you have some helpful hints you’d like to share, please post them in the comments below. I love hearing from you!
Have a terrific rest of your day and until next time… happy stitching! 🙂
XOXO!!


This is such good information!
I have two long flights this summer. I was concerned about having enough light. But I think I found the solution-rechargeable lights for around your neck. Adjustable light setting, inexpensive, from Amazon, and usb rechargeable. I bought two, so now all set for my flights. And I’m finding them useful while stitching at home in some settings.
I’m so glad you found the blog post helpful, Monica! Thank you for sharing your tip, too.
Happy stitching…
XOXO!
Ellen
These are great for reading too! My husband bought one for him, one for me and one for our daughter!!
🙂
I remember many years ago reading about Polly Bergen, the actress, who was also an avid stitcher. She wrote about stitching on an airplane and when she stood up to exit the plane she discovered that she had stitched her piece to her skirt. She walked off the plane hunched over with her coat on and clutching her needlework.
Hahahaha… that’s hilarious! Thank you so much for sharing it with us, Susan. 🙂
I can totally imagine doing something like that myself!
Fun side story… My parents and I visited Los Angeles when I was in the 5th grade. We took one of those bus tours of the stars’ homes. There was a guide book that came with the ticket and I remember seeing her picture in the book, and thinking how pretty she was. I’ll bet she had some lovely needlepoint pillows… 😉
Happy stitching…
XOXO!
Ellen
Thought I was the only one that packed needlepoint first!
Seriously I am now retired and my motto is if I can’t wear jeans, I’m not going. Except this summer is too hot for jeans so I’m opting for capris. Easier to pack clothes than needlepoint. If I’m going to the beach with kids and grandchildren, I have a LOT of time to stitch as I burn easily and mainly stay indoors. Great tips, although I’m usually the driver so it’s just stuff I will stitch when we get there. Great blog!!!
Hi Debbie!
I’m so glad I’m not the only one who packs their stitching first… 😉
And I love your new “relaxed attire” motto. I saw something online the other day describing a “new” aesthetic called Coastal Grandmother. I’ve decided that’s definitely me, so I’m down. You ought to check it out. 🙂
I’m not a sun worshiper anymore, so I’m right there with you on staying inside (or in the shade), too. I’m delighted that you enjoyed the blog post. Thank you for reading it and for taking the time to send me a note. It’s great to hear from you.
Have a terrific rest of your day and happy stitching!
XOXO!
Ellen
THANK YOU, Ellen, with this great information. Makes planning and packing so much easier. We are going on a Long trip (3+ wks). This gives me guideline on what to take, plan and diversify.
Thank you
Hi Shirley!
It’s so nice to hear from you. 🙂
I’m tickled that you found the info in the blog post helpful. Have a terrific time on your trip!!
Happy stitching…
XOXO!
Ellen
Please keep your car piece small. Should you get in an accident, a bigger frame could cause serious damage to your chest/face.
Good advice, Linda! Thank you for sharing it…
XOXO!!
Ellen
I love the warning about not beading. I can just imagine trying to pick all those up. I also have one of those adjustable lights from Amazon you put around your neck and twist to wherever you want the light. Handy for needlepointing or reading in the car or in the middle of the night when I can’t sleep and don’t want to bother my husband. Mine isn’t rechargeable but the batteries last a long time. About $10 I think. Worth every penny.
Hi Linda!
Thank you for sharing the tip about the adjustable light. It’s always nice to have a variety of tools to help make our stitching go more smoothly. 😉
XOXO!
Ellen