
Last week, we explored some slanted stitches that you can use to embellish your needlepoint canvases. And guess what?! Now we’re gonna explore cross (or crossed) stitches. A crossed stitch is comprised of two – or more – straight stitches that cross over each other to form a new stitch. They come in lots of different shapes and forms, including the standard cross-stitch, the upright cross stitch, and the Smyrna cross, just to name a few. 🙂
Before we go any further, I want to share a few general tips about using crossed stitches on your needlepoint canvases…
- When stitching on mono canvas – which is what most of the canvases we’re stitching on are – it’s best to execute each cross stitch unit as you work your way across the row. (This will help prevent canvas distortion.)
- Since cross stitches are layered stitches, it’s always wise to consider using a slightly thinner thread than you might otherwise use so that your stitches don’t get too bulky.
- It’s super important to be consistent with the order of your stitches. In other words, keep the top legs of your crossed stitches all going in the same direction. Mixing things up just makes for messy-looking work and I’m sure that’s the last thing you want for your project.
Alrighty, are you ready to delve into some cross stitches that you can use to add texture, perspective, and movement to your painted canvases?
Terrific… Let’s dive in!
Let’s begin by taking a closer look at our canvas – “North Pole Elf” by Pepperberry Designs…

The very first task to tackle when choosing stitches and threads for a new project is to identify the design components.
And this cutie pie canvas features several…
- the elf
- 5 gift packages
- 2 Christmas trees
- the snow-covered ground
- oodles of snowflakes
- the background
Next on the agenda is to make a list of descriptive words for each of those design components. (If you missed my first blog post in this series, click here.)
After you’ve made your list of descriptive words, it’s time to begin brainstorming thread possibilities. And you may want to start thumbing through stitch books, too. Since we only have a little bit of time, I’ll share a few of my favorite cross stitches with you. You can use them on this canvas or on any canvas that features similar design components. 🙂
We’ll start with the simplest of all cross stitches – the standard cross stitch.
It’s the easiest of all of the cross stitches and it consists of two diagonal stitches laying over a single canvas intersection, but with each stitch slanting in opposite directions. (You may also execute the standard cross-stitch over two canvas intersections to create a larger cross stitch.)
A standard cross stitch is a terrific option for the white polka dots on the purple gift package.
Why’s that? Well, let’s consider texture first. Because the standard cross stitch has two” layers” (remember – two stitches slanting in opposite directions lay across the same canvas intersection), stitch units will be slightly raised off the surface of the canvas and they’ll really look like dots. And because the single white dots cover one canvas intersection, the standard cross stitch units nestle perfectly into the spaces, so they definitely fit the bill when considering scale/perspective. And finally, when you pair the standard cross stitch with a thread such as Petite Silk Lamé Braid, the light that reflects off the metallic filament implies a sense of movement.
Oh – and you could definitely use the standard cross stitch for the small white snowflakes, too.
If you decide to use the standard cross stitch in more than one place on a canvas, I recommend that you use different threads, though. For example, Kreinik #4 Very Fine Braid (#5760) would be a wonderful option for the itty bitty snowflakes.
Here’s a diagram of the standard cross stitch for you…
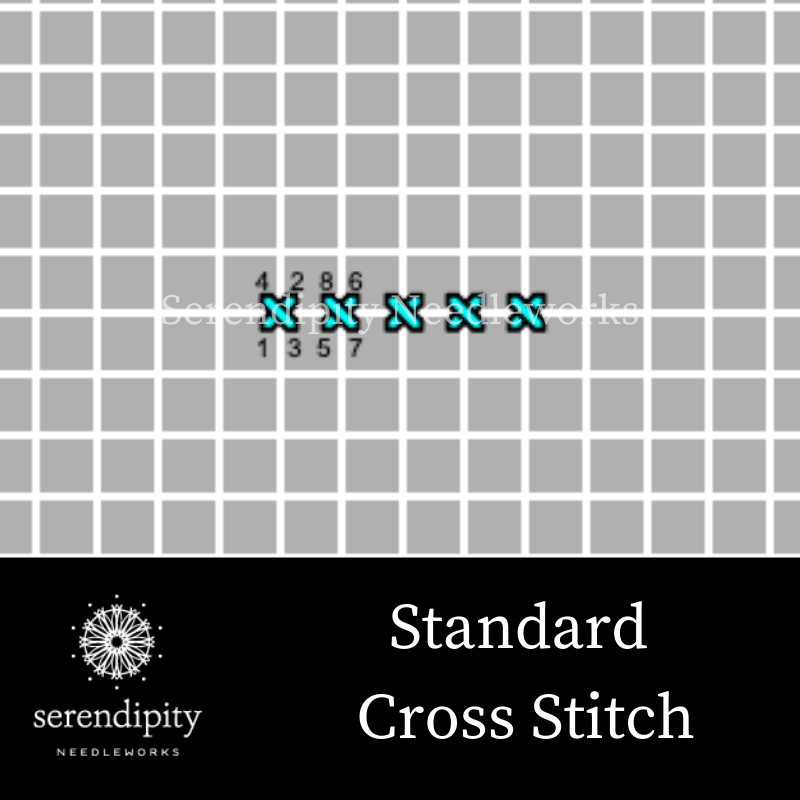
Think of stitch diagrams as your roadmap.
Use the numbers as your guide for where to place your needle (bring your needle to the front of your canvas on odd numbers and take your needle to the back on even numbers). Just follow the map and you’ll be golden!
Next, let’s take a peek at the upright cross stitch (a.k.a. straight cross stitch).
Very similar to the standard cross stitch, the upright cross stitch includes two straight stitches – one vertical and one horizontal – worked over two canvas threads. Work this stitch in horizontal rows and be sure to complete each upright cross stitch unit before moving along to the next one.
Since it covers only two canvas threads, the upright cross stitch is a relatively small stitch. You can use it in a variety of spaces. It’s one of those neutral stitches, which means that it doesn’t draw your eye in any particular direction.
The upright cross stitch is one of my “go-to” filling stitches and that makes it ideal for the Christmas trees on our canvas.
Pairing the upright cross stitch with a lovely multicolor silk thread, like Planet Earth 6-Ply Variegated, creates a winning combination that adds just enough visual interest to keep the viewer’s attention without detracting from the overall unity of the design. The texture of the upright cross stitch and the subtle shift of color in the over-dyed thread captures the essence of an evergreen tree in the forest. And the small size of the upright cross stitch evokes the sense of distance that you want to achieve for a design component in the background.
Here’s a diagram of the upright cross stitch for you…

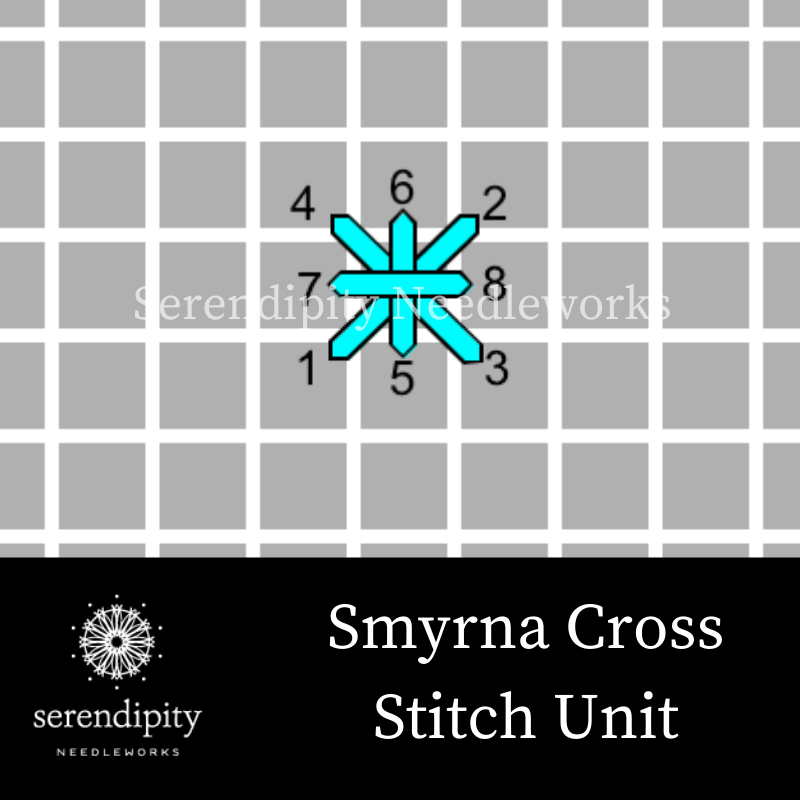
Now, let’s look at the Smyrna cross.
The Smyrna cross is a combination stitch. That means two different stitches are put together to create a new stitch or stitch pattern. In this case, a standard cross stitch is executed over two canvas threads, followed by an upright cross stitch worked over (the same) two canvas threads. Work the Smyrna cross stitch in horizontal rows, completing each stitch unit before moving along to the next one.
It’s great for small design areas which means that you can use it for accents – like snowflakes – on your needlepoint canvases.
One of my favorite thread combinations for stitching Smyrna cross snowflakes is Soie d’Alger + Accentuate.
The blend results in a glittery mix reminiscent of new-fallen snow on a frosty winter day. I like to use two strands of Soie d’Alger and two strands of Accentuate on 18 mesh canvas. The Smyrna cross is a slightly larger scale stitch than the standard cross stitch that we used for the teeny tiny snowflakes. Using these two stitches together evokes a sense of depth, giving a more three-dimensional perspective to this two-dimensional painted canvas.
Here’s a stitch diagram of the Smyrna cross for you…
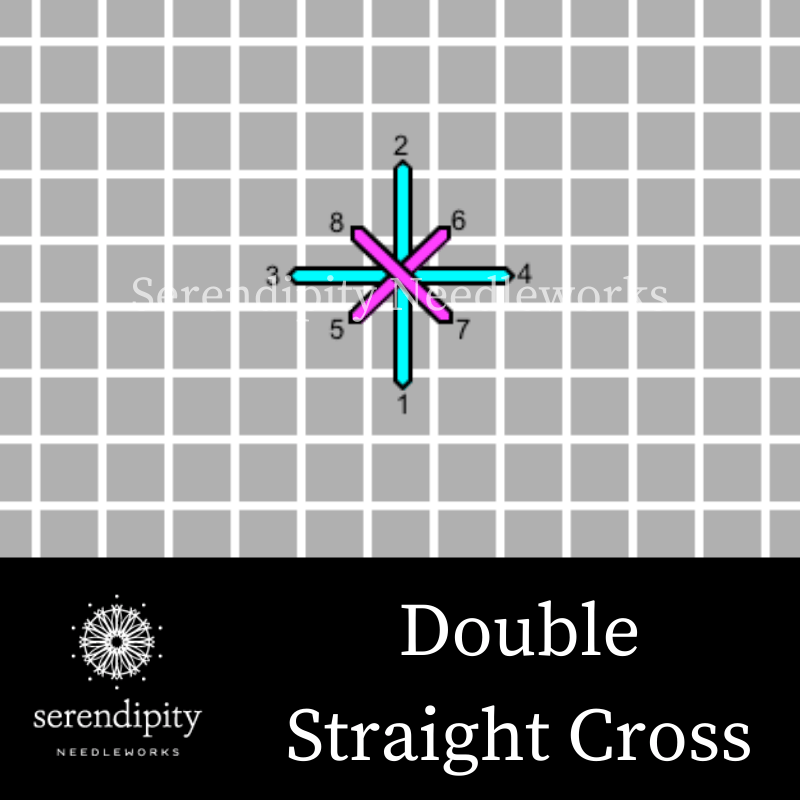
Finally, let’s look at a stitch option for the snow design component on our canvas – the double straight cross stitch.
The double straight cross stitch consists of two cross stitches – an upright cross stitch executed over four canvas threads, followed by a standard cross stitch worked over two canvas threads. Work this stitch in horizontal rows and complete each stitch unit before moving along to the next one.
The double straight cross stitch is largish in size, so it’s an excellent choice for the snowy hill that the elf is standing upon. Employing the larger double straight cross stitch here ties together the use of other cross stitches on the canvas to create a sense of overall unity on the piece, too.
Pair the double straight cross stitch with sparkly threads, like Rainbow Gallery’s Petite Silk Lamé Braid and Petite Treasure Braid, to mimic the look of snow that’s been frolicked in by a bunch of happy-go-lucky elves. In order to establish clear stitch definition, use the Petite Treasure Braid for the tall upright cross of the stitch and the Petite Silk Lamé Braid for the smaller standard cross stitch.
Wondering what I mean by “clear stitch definition”?
Well, it’s really just a fancy way of saying that you can see the individual stitches that make up the unit. You see, when you use a highly metallic thread (like Fyrewerks or Kreinik Braid) for a layered stitch, it ends up looking like a blob on the canvas. That’s because the light reflects off the thread so much that you can’t see the individual stitches that make up the unit.
Here’s a stitch diagram of the double straight cross stitch for you…
Alrighty, my friend, that brings us to the end of our look at crossed stitches that you can use to embellish your needlepoint canvases. You can use these same four stitches in oodles of other different ways, too – especially when you pair them with the myriad of threads available to today’s stitcher. Channel your inner kindergarten self and play around with different combinations on a doodle canvas. I can’t wait to see what you come up with. 😉
Next time, we’ll explore knotted stitches, so until then…
Happy Stitching!
XOXO!!

PS: Click here to hop over and check out our YouTube Channel where you can watch previous episodes of Needlepoint TV™ – and subscribe so you don’t miss out on any new goodies we add there! 😉


I have been stitching hand embroidery for more than 40 years. I have always used needlepoint canvas in lieu of fabrics for a variety of designs. I also incorporate beadwork. I am happy to see the return to embroidery although most is basic beginner info. Many of my embroidery shops have closed over the years.
Hi Nancy!
Thank you for taking the time to write. It sounds like you’re quite an accomplished stitcher. 🙂
I, too, am tickled to see people returning to handwork. Embroidery is such a wonderful hobby! Have a terrific rest of your day and happy stitching!!
XOXO!
Ellen 🙂
Ellen, you answered my question re: cross stitch on mono canvas. I wanted to make a sampler using opalescent black aida and would only find black metallic mono canvas – it’s nice to know I can use it instead of the aida.
So glad I could help, Deborah! Happy stitching…
XOXO!
Ellen