
So, you want to learn to needlepoint? Well, my friend, you’re in the right place. You see, I’ve been a stitcher for a reeaaalllly long time. My grandmother taught me how to do the continental tent stitch when I was nine years old – on a canvas that looked very much like the one in the picture above. I also owned a needlepoint shop for 14 years – and I have an online “learn to needlepoint” class called Needlepoint Made Easy. 🙂
But I digress…
Let’s get back to helping you learn to needlepoint.
I’m guessing you already believe that needlepoint can be a very rewarding hobby. And I’m tickled pink that you’re here with me today – so I can share some of the things I’ve experienced along the way. Think of me as your needlepoint guide. I’ve already made (or seen!) just about every mistake there is to make, so I’m eager to help you avoid those things that can cause you to throw up your hands in despair. Ready to get started? 😉
Getting Started
There are more options available for today’s stitchers than ever before – and that can be both good and bad. It’s good because it means that we have oodles and oodles of goodies from which to choose. And it’s bad because all of those options can be very overwhelming. I mean, really – how do you even know where to start?
My best suggestion is that you begin with a local shop if you’re fortunate enough to have one in your hometown – or one that’s not too far away. My local shop, Magic City Needlepoint, is an easy hour’s drive up I-59/20 and I’m ever-so-glad to have them that close! It’s always lots of fun to make a day trip to Birmingham. 🙂
If you don’t have a shop within driving distance, consider using one that offers mail order services. A couple of my favorites are The Stitching Studio (Richmond, Virginia) and Chandail Needlework (Houston, Texas).
Learn to Needlepoint
If you’re brand-spankin’ new to needlepoint, there are a few things you need to know…
- There are three main types of needlepoint canvas: mono canvas, Penelope, and interlock. Click here to read more about them.
- Tapestry needles are the needle of choice for needlepoint. Click here to read more about them.
- The tent stitch is the workhorse stitch in needlepoint.
Did you know that the word “needlepoint” is the blanket term used for petit point and gros point? What’s that? You’ve never heard those terms before? Well, they’re just fancy terms for the slanted stitch – the tent stitch – that you’ll use when you learn to needlepoint. So don’t fret! I’ve got your back.
Petit point refers to the smaller of the two (think “petite”) and gros point pertains to the larger (think “gross”, as in big). Both petit point and gros point stitches look like half of a cross stitch, slanting toward the right – like you see in the picture below. Always slant the basic tent stitch in the same direction. And always, always use your needle in and up-and-down stabbing motion instead of “sewing” each stitch in a single movement.

So, now that you have those things under your belt, are you ready actually learn to needlepoint? Terrific!
You’ll begin by anchoring your thread.
Granny taught me how to secure my thread this way and it still serves me well today.
Now, first things first – knots are a “no-no”. At least, those you leave in are. Instead, leave about 1″ of thread on the wrong side of the canvas and work over it as you execute the next several stitches. (Hold the thread down with your finger until you stitch over the tail, securing it to the canvas.)
And when you run out of thread, run your needle under some of the stitches on the wrong side of your canvas for about 1/2″. Snip off the extra thread close to the canvas, being careful not to cut the surrounding stitches.
Then, to start a new piece of thread, secure it by running your needle under a few of the previously worked stitches (adjacent to where you were stitching) – again, on the back of your canvas. Use lengths of thread no longer than 22″.
Earlier, I mentioned that the tent stitch is the workhorse stitch in needlepoint.
Did you know there are three variations of tent stitch?
- half-cross
- continental
- diagonal tent (aka, basketweave)
Each variation has its advantages and disadvantages. Let’s take a peek at all three of them. Sound good?
The Half-Cross Stitch

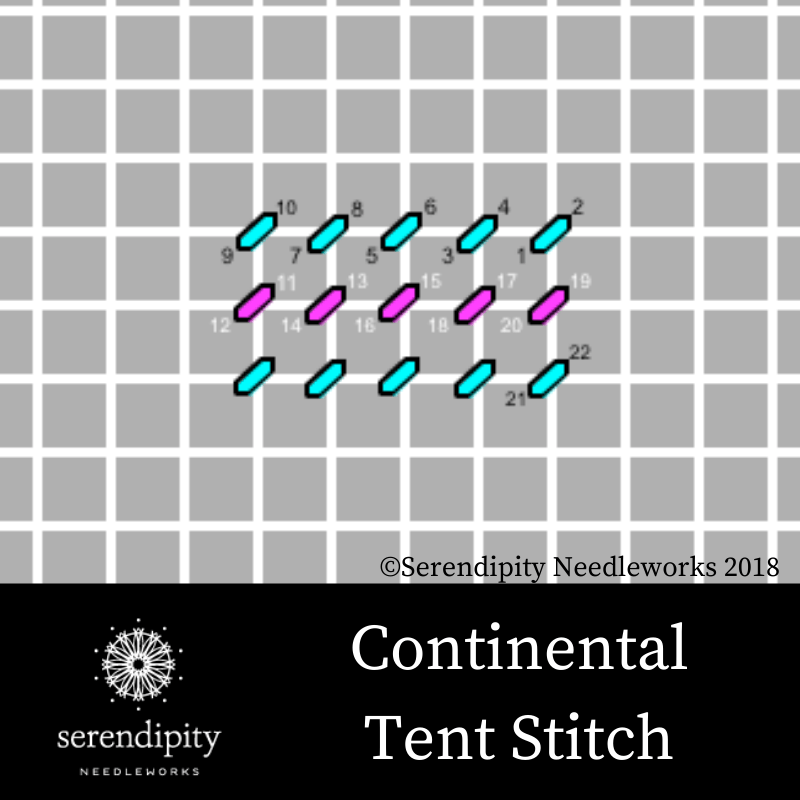
Continental Stitch
The continental variation of the tent stitch uses quite a bit more thread than the half-cross variation and that’s what makes it more sturdy. You can work the continental stitch in horizontal or vertical rows, but it’s essential that you maintain consistency across your piece. In other words, if you start working your canvas in horizontal rows of continental tent stitch, stay the course and work all of the rows horizontally. If you mix things up and work part of the canvas in vertical rows and part of it in horizontal rows, you’ll end up with a canvas that looks splotchy. A word of caution… continental stitch distorts the canvas – especially if you don’t use a frame.
Here’s a diagram for executing the continental tent stitch variation.
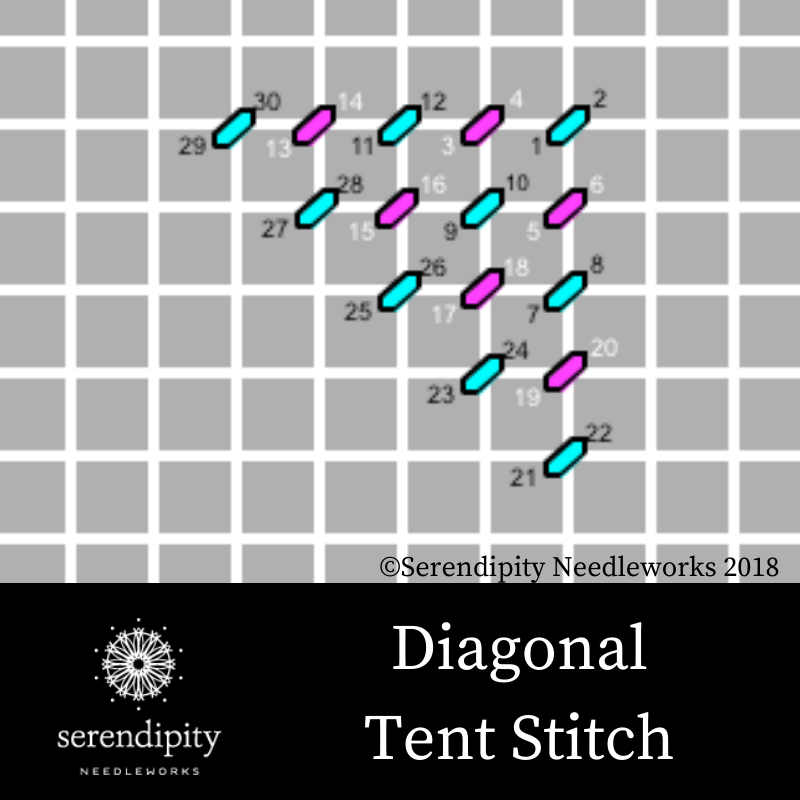
Diagonal Tent Stitch
Also known as “basketweave”, this variation of the tent stitch is the most durable and it’s also the one that makes blocking easy-peasy. Why? Because it doesn’t pull the canvas out of shape, especially if you use a frame. It’s a terrific option for all kinds of projects – from pillows and rugs to ornaments and Christmas stockings.
It creates a thick pad on the back of the canvas and uses approximately 40% more yarn than the half cross stitch. When you look at the back of a canvas worked in the diagonal tent stitch, it looks woven – and that’s where the nickname “basketweave” comes from.
This variation of the tent stitch is worked on the diagonal, hence the name. And here’s a diagram that shows you how to execute it.
And that, my friend, is my brief “Learn to Needlepoint” lesson for you. If you’d like to get more information on my Needlepoint Made Easy online class, click here.
Are you on our Serendipity Needleworks NeedleNotes list? That’s where we share tips, ideas, events, and cheer each other on and I’d love to have you join me, so click here to subscribe. I’ll see you there! 😉
Have a terrific rest of your day and until next time…
Happy Stitching!
XOXO 🙂


Great site.
Thank you so much, Pam!
XOXO!
Ellen 🙂
I need a needle point to do. Easy on the eyes. I have macular in one eye. I do know how to needle point. I do continental. I need something without much shading.
Hi Phyllis!
Thank you for stopping by for a visit on my website. My best recommendation is to contact Kathy at The Stitching Studio in Richmond, Virginia or Saira at Chandail Needlework in Houston, Texas. Both shops help people via mail order and if you’ll just tell either one of the ladies what you’re looking for, I’m sure they’ll do their best to help you.
XOXO!
Ellen