
It’s time to work the background of our lovely little Florentine Bauble by Kirk and Bradley Designs.
I’m having oodles of fun to stitching it – and it reaffirms what I already know (but sometimes forget!) – that working a canvas entirely in tent stitch is both relaxing and rewarding. (And it’s really good practice for perfecting your stitch tension, too!)
Last time, we chatted about how to work tiny little motifs and before that, we took a look at how to read your canvas. Did you read those posts yet? If you didn’t, I recommend starting there.
And before we go any further, I want to answer Carol’s question…
about clarifying the difference between continental and half-cross tent stitch variations.
(Thanks for asking, Carol – I’m sure you’re not the only one wondering.)
Here are a couple of pictures to show you what the back of each tent stitch variation looks like…
The back of the continental variation of tent stitch has long slanted stitches when you flip your canvas over – just like you see in the picture below.

And the back of the half-cross tent stitch variation features short vertical stitches like those you see in that picture down there.

I go into lots of detail about the difference between the three variations of tent stitch in my Needlepoint Made Easy course (plus A LOT more!). If you taught yourself to stitch, or if you’ve been away from needlepoint for a long time, you might want to click here to check it out.
Alrighty, whaddya say we look at stitching that background now?
First, I’m stitching the blocks of open space between the motifs in diagonal tent stitch.
I’ll come back and fill in the gaps between those later.

Here’s a picture of the partially completed background…
I’m using Pepper Pot Silk in Paprika and I ❤️ this color! We’re exploring color this fall over in The Stitcher’s Club and it’s sooo much fun to identify the different kinds of color schemes that needlepoint designers use on their projects.
It’s helpful to know the basics of color theory, too – so you can alter the colors on a needlepoint canvas to better suit your taste.

Now, let’s take a peek at filling in the spaces between the petals on those flowers…

I’m working in basketweave in this picture, but soon I’ll have to switch over to using continental. It’s always a good idea to work as much of a canvas as possible in basketweave.
Why? Because it’s the least likely of all three tent stitch variations to distort your canvas.
Continental tent stitch is my second choice and I avoid half-cross as much as possible.
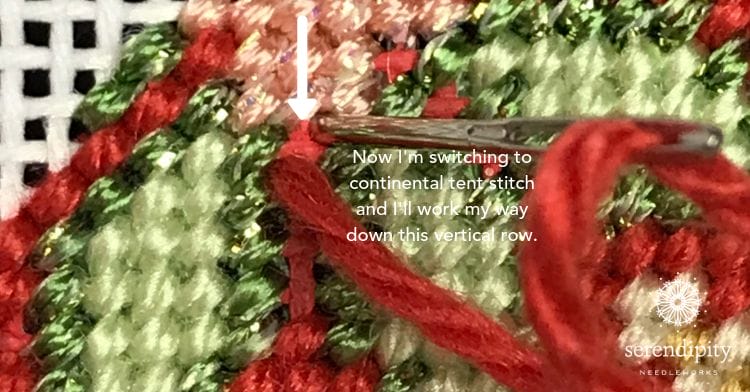
And now that I’m ready to work my way down between two flower petals…
it’s time to switch to continental tent stitch.
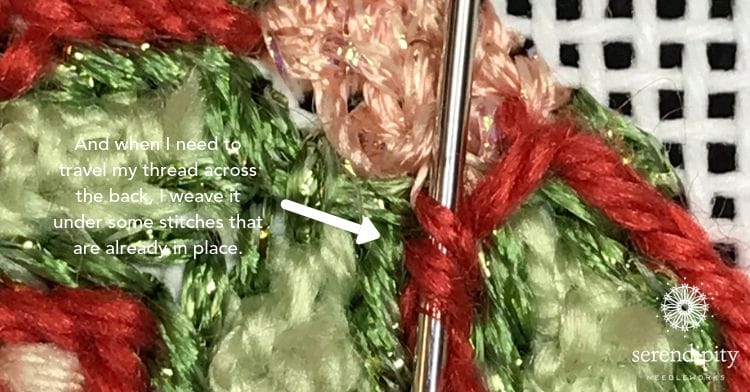
When it’s time to carry my thread to move to the next area, I weave through the back side of some stitches that are already in place.
Just like you see in the picture below…
I’ll continue working the background in this manner until I’ve filled in all of the background stitches.
Want to see the finished result? Be sure and follow me on Instagram!
Alrighty – that’s all for today, but before you go, I’d love to know if you have a project that you plan to stitch entirely in tent stitch.
Just tell me in the comments box below. (Tell me a little about it, too.) And I’ll add your name to the drawing for that cutie-pie Serendipity Needleworks needle minder.
Until next time, happy stitching!
XOXO

PS: Are you on our Serendipity Needleworks NeedleNotes list? That’s where we share tips, ideas, events, and cheer each other on and I’d love to have you join me, so click here to subscribe. I’ll see you there! 😉


I have a luggage tag that I’m doing in basket weave.
That sounds like a fun project, Barbara! Is it for you or is it a gift?
XOXO!
Ellen
Ellen: this information and your tips are so helpful. I am working on an oldie but goody project that is very similar. I am filling in the unfinished areas with basketweave and some areas are requiring continental. The canvas was 90% finished by my mother-in-law and is quite wonky. It’s much better now after having been on stretcher bars. It has weird shapes, flowers, vertical lines on a blue and white vase and some background to be filled in. This is a 16”x18” Kaffe Fassett for Ehrman, 1989. It will be a gift for one of my step-daughters eventually. Twin girls will have their choices of their grandmother’s work.
I will send you a photo separately. Thank you for your expertise and inspiration today and always.
Pamela
Hi Pamela!
Thank you for sharing your project with me. It sounds lovely! I adore Kaffe Fassett’s designs – needlepoint, knitting, and quilting! 😉
I’ll look forward to receiving the picture. And what a wonderful gift you’re giving your stepdaughters. I’m sure they’ll be thrilled!
Have a wonderful rest of your day!
XOXO!
Ellen 🙂
I took your advice and worked some background of an ornament in basketweave. It took a while to really get the hang of it. I was not used to looking diagnally for the next stitch placement. It also did not help that I was using white wool thread on a white 18 mesh canvas. Once I got going it went rather quickly. I got a little stumped at the end of rows, but soon learned not to add too many stitches that were really for future rows. I also used your trick to remember which direction I was traveling since I am using interlock canvas. All in all, it turned out quite nicely if I do say so myself!!! Thanks for the tips.
Hooray! I’m tickled to hear that you’re pleased with your results, Jane. That’s terrific news!!! Thank you for sharing your experience with me. I especially appreciate you sharing that you ran into a bit of a snag at the ends of the rows. Definitely the subject for a future blog post! 😉
Have a happy weekend!
XOXO!
Ellen 🙂