
Have you ever been stumped by how to work a diagonal tent stitch (a.k.a. basketweave) background around a bunch of weird shapes? Or even how to stitch those irregular shapes in the first place? Well, fret no more! I’m here to help – and I’ll share some tips that you can use on canvases both large and small.
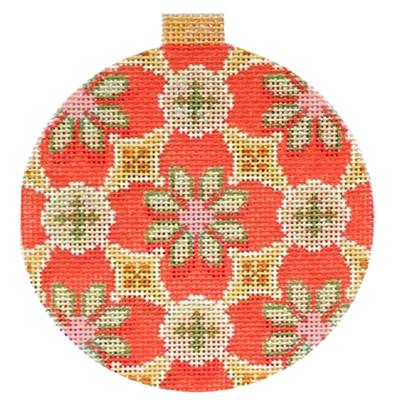
Below is a picture of “Florentine Bauble” by Kirk and Bradley. It’s a really good example of a piece that has oodles of stopping and starting on it.
I’m working it entirely in basketweave so you can see how I tackle the “trouble spots”. Ready to dive in? Terrific!
Let’s get started…
First, apply that good ole mnemonic device “up the steps and down the poles” when you’re stitching.
And when I say “apply”, I mean really and truly stitch that way.
Every. Single. Time.
You see, when you do that, you can start and stop anywhere on your canvas and, eventually, all your stitches will mesh together seamlessly.
What’s that? You don’t know how to read your canvas?
No worries… I’ll help you!
But, before we go any further (and especially if you’re new to needlepoint), you might want to click here to hop over and read about the different kinds of needlepoint canvas.
Go ahead – I’ll just have a cup of tea while I wait for you… 😉
Gee – that was quick!
Ready to dive into how to read your needlepoint canvas now?
Terrific!
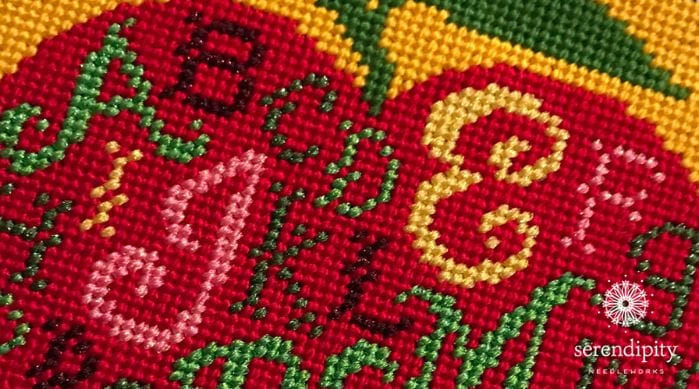
Needlepoint canvas is a plain weave open grid fabric. You can see how the individual canvas threads weave over and under each other in the picture below.
The blue marks indicate where the horizontal threads are on top of the intersections where the threads meet.
They kinda look like little steps, don’t they? And that’s where “up the steps” comes from.
The red marks show where the vertical threads are on top of the intersections where the threads crisscross.
And they kinda look like those poles that firemen slide down to get to their firetruck – hence, “down the poles”.
Are you with me so far? Terrific!

Now, when you stitch “up the steps” and “down the poles” your work will look much nicer for two reasons…
First, you’ll get better coverage and your stitches will look more uniform because you’re stitching with the grain of the canvas.
And second, stitching “up the steps” and “down the poles” helps stabilize the canvas intersections so your piece doesn’t get all wonky. (That’s one of the biggest benefits of using basketweave.)
Oh – and I almost forgot this one… when you stitch “up the steps” and “down the poles”, you won’t accidentally stitch two rows in the same direction and end up with a yucky ridge on the front of your work. (Alternating the direction that you stitch each row keeps that from happening.)
So, I guess that’s actually more than two reasons. 🙂
Alrighty, back to stitching our Florentine Bauble in basketweave…

I’m working my lightest colors first. This is one of those oddball shapes that can really throw you for a loop when you’re working in basketweave. It’s hard to know exactly where to begin, isn’t it?
My best suggestion is to find the longest continuous diagonal row that you can work. Stitch that row first, and then use it as your “jumping off” place for working the rest of the area.
You’ll have to carry your thread across the back in a few places, but as long as you don’t carry it across more than half an inch (or 3 – 4 canvas threads) it’ll be fine.
Next time, we’ll take a peek at working a section of the background in basketweave.
Do you have a canvas that’s giving you fits right now?
Tell me about it in the comments box below.
I have another needle minder that I’d like to gift to someone this month, so every time you leave a note in the comments box, I’ll enter your name in the November drawing. 🙂 (squeeeee – I just ❤️ giving things away!)
If you’re not getting NeedleNotes every week, click here to add your name to the list right away. I don’t want you to miss anything! (And yes – I share some extra special goodies just with my subscribers.)
Alrighty – that’s all for now.
Until next time, happy stitching!
XOXO!

PS: Our October winner of the Serendipity Needleworks needle minder is Laraine Croall. Congratulations Laraine – and thank you ALL for sharing your thoughts with me.


I followed you until you showed your work in progress stitched piece. I’m not sure where you started or which direction you stitched. Would you consider marking the photo the next time? Great information!
Hi Denise!
Thank you for your note. I’ll be happy to clarify that for you in some new pictures in the next blog post. 🙂
And thank you for the suggestion… I’m sure you’re not the only one with that question. 😉
Have a happy Thursday.
XOXO!
Ellen
Great question! I am having stitcher’s block on several small ornament canvases for this exact reason. On Ellen’s example, I wonder if she started with the light gold at the top right of the design area? If stitching lightest colors first, to me this would be the place to start even though it is not the largest area. So, if you find the largest area in that stitched design motif, it would be the darker gold, two rows to the right of the metallic square on the right? The started thread is now covered; so you can’t see the knot. I tend to look at my canvas straight on; this photo is on an angle. Love the starting tip of going over only 3 or 4 threads ????. Love these lessons on basketweave. Mine is looking better and better. Thank you, Ellen ????
Hi Pamela!
You made some terrific observations in your note. I’m going to frog one of the motifs, then re-stitch it, creating a step-by-step (and take some new pictures) for y’all along the way. Soooo… this will be next week’s blog post. And I’ll be sure to take the pictures straight on to make it easier for you to see what I’m doing in the step-by-step breakdown.
And thank you for your kind words. It means so very much to me to know that I’m helping you develop your needlepoint skills. ❤️
XOXO!
Ellen 🙂
Ellen, your instruction on basketweave has been so helpful. I know I am totally in stitchet’s block with a few ornaments. I’d like to do done decorative stitches, but these small canvases just don’t seem the place. So, question is where to start basketweave? I think I will dive into one if those today, following the instructions in this post ????. Thank you ????
Hi Pamela!
Thank you for taking the time to write. I’m so glad you found the info on basketweave helpful. 🙂
I’ll be happy to help you with the best place to start your canvas. Why don’t you choose the one you want to do and send me a picture (or share it in our Stitcher’s Club FB group), then I’ll get right on it so you can get started. Sound good?
Looking forward to seeing that picture…
XOXO!❤️
Ellen
Hi Ellen: I did post a photo and my analytical attempts on the FB Stitchers Club. It’s an owl ???? ornament. Thank you. So glad you are here to help.
Pamela
Hi Pamela!
Thank you for your note… I found the picture. 🙂
I left you a couple of questions over in the FB group. And I’m so glad I’m here to help, too! It’s my pleasure. 😉
XOXO!
Ellen
I put the post in the wrong place. It’s on Serendipity Needleworks ????
No worries, Pamela. I found it. 🙂
XOXO!
Ellen
A great description and helpful until you got to actually explaining where to start on the odd shapes. It would have been better to show us where you started and the path you took to basket weave the shape for each of the colors. Perhaps using a picture of an unstitched shape and use numbers the show the order of the stitches.
Hi Sylvia
Thank you for taking the time to write. I appreciate your suggestion and have already “frogged” one of the motifs to do exactly what you described in my next blog post. Keep an eye out for it next Thursday. 😉
Have a happy weekend!
XOXO!
Ellen
Thank you so much for clearing that up. I am relatively new to needlepoint and joined your group in October. I have always gone up one row and down the other but didn’t realize I had to start the up rows on the horizontal and the down rows on the vertical. Using the term “steps and poles” makes it easier to understand.
Blessings, Marilynn
Hi Marilynn!
Thank you so much for taking the time to write and WELCOME! Reading that the info in this post was helpful got my day off to the best-est of starts! 😉
I’m tickled that “up the steps and down the poles” makes sense and that you’ll be using it from now on.
Have a happy Thursday!
XOXO!
Ellen 🙂
Thank you for notice of the win. I was reading the post and saw that. I read everything including the comments from others and your comments to them. Really have enjoyed the learning about needlepoint. Did not realize that needlepoint was so complex and beautiful. Thanks again
Laraine
My pleasure, Laraine! Thank you for being so supportive of me and my work. It means the world to me!!!
XOXO!❤️
Ellen
I have lots of interlock canvas that I am using up (reducing the stash). How does “up the stairs, down the ladder” work on this type of canvas? I usually do continental stitches, but not for large areas because it tends to look lumpy or striped. Thanks for your advice.
Hi Jane!
Thank you for your question. It’s a really good one. And the answer is that “up the steps and down the poles” doesn’t apply to interlock canvas. My best advice with working on interlock is to just make sure that you alternate the direction of your rows, taking care to never stitch two “uphill” or “downhill” rows side by side. I hope this helps – and please reach out if you have more questions. I’m happy to help.
XOXO!
Ellen 🙂
How does this work for interlock canvas (my preferred canvas)? There really isn’t a discernable pole or step!
Hi Jane
Thank you for your question. And you’re so right – it doesn’t apply to interlock canvas. 😉
When working basketweave/diagonal tent stitch on interlock canvas, the main thing to remember is that you must alternate the direction of your rows and never work two rows in the same direction side by side. What happens when you work two “uphill” rows or two “downhill” rows side by side? You get a yucky ridge. 🙁
Please reach out if you have more questions. I’m happy to help.
XOXO!
Ellen 🙂
Having a time trying to fit the basketweave stitch in between other specialty stitches.
Thank you for your help.
Hi Libby!
Thank you for your note. I’ll be sure and address that in this little mini-series on basketweave. If you could send me a picture of your trouble spot to me at [email protected] that would be terrific!
Happy Thanksgiving!
Ellen 🙂
I am working a piece that has some diagonal painting that goes up and the the left. Should I turn the canvas so that it can be done in basket weave?
Thank you!
Hi Dee
If you’d like to send a picture to me, I’d be glad to take a look at your canvas. You may send it to [email protected].
Happy stitching…
XOXO!
Ellen
Thank you!
I’m working on a canvas called “As Thin as my Patience” and its done in basketweave. The thin black lines are driving me nuts. Someone told me to do all the black first, but it feels better to work in a basket weave formation and change colors as I get to them. Similar to tapestry weaving or stranded knitting. However I’m really stummped on how to handle thin, curving black lines. What is the best way to handle this?
Hi Carissa!
Thin curving black lines can be very challenging in basketweave since it’s impossible to get a smooth curve when working in certain directions. Regarding the suggestion to work the black lines first, I don’t ever recommend doing black first on a basketweave project. Instead, I recommend stitching the lightest sections first, then working your way through to the darkest. That would leave the black lines for last. I hope this helps.
XOXO
Ellen