
So, you have a cute little ornament that you want to stitch for a special someone. And you’d like to jazz it up with decorative stitches, but all of the design components are SO small! Which needlepoint stitches can you use for those small spaces? That’s a terrific question…
The main objective when choosing stitches for small spaces…
is to be sure that you can work three repeats of the stitch pattern in the space.
That means three vertical AND horizontal rows need to fit into the area, otherwise, you won’t be able to “see” the pattern.
Take a look at the mosaic stitch diagram below…
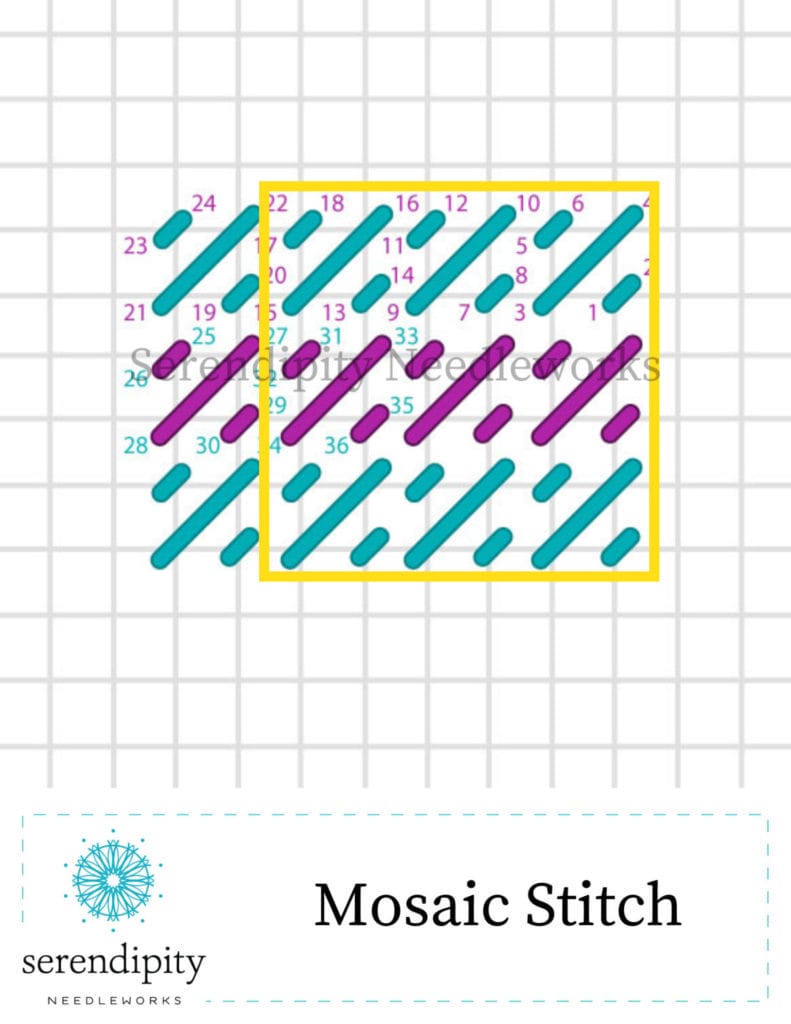
There are three repeats of the pattern inside the yellow box. 🙂
And that’s the minimum (of the stitch pattern) that you’ll need room to execute in the space on your canvas.
If the shape on your canvas is irregular, you’ll also work portions of individual stitch units where full units won’t fit. Just make sure you stitch at least nine full stitch units so that you can tell what the pattern is supposed to look like.
If three repeats of the stitch pattern won’t fit in the space, you need to find a smaller stitch.
Now, let’s take a peek at three of my favorite needlepoint stitches for small spaces…
Of course, there’s the mosaic stitch.
It’s an especially good choice for canvases that feature building and houses. You can also use it for backgrounds. Here’s the diagram without the yellow box on it. 😉

Another terrific small stitch is the brick stitch.
The brick stitch is great for clothing of all kinds – and it’s really good for backgrounds, too!
Here’s the diagram for you…

There are two ways to execute the brick stitch: in an alternating (up and down) motion across the row and like you see in the diagram above. I prefer the second method (Brick Stitch 2) because the stitch pathway is more consistent. And that means your stitches stand up straighter and lay more smoothly on the canvas. 🙂
And finally, the T-stitch is an awesome little stitch for small spaces.
It’s particularly lovely when the painted design features a lot of detailed shading. The openness of the stitch allows some of that shading to show through your work, creating extra depth and visual interest.
Here’s the diagram for you…

Of course there are oodles more stitches for small spaces, too.
Actually, there are hundreds and hundreds of canvas and surface embroidery stitches you can use to transform your painted canvases into three-dimensional pieces of needlepoint art.
The problem is that lots of stitchers don’t know how – or where – to begin choosing stitches and threads for their needlepoint canvases.
If you’ve been following me for a while, you know that this is my ALL-TIME favorite needlepoint topic.
In fact, I’m teaching a new workshop about this very subject later this week. It’s only $9 and you can choose the time that best fits your schedule. (I’m offering it three different times!) And if none of the times work, we’re also recording it, so you can watch the replay later. 😉
During our time together, you’ll…
Discover Why Your Projects Don’t Turn Out The Way You Want Them To
When you buy a new painted canvas – or pull one out of your stash – it can be soooo tempting to jump in and start stitching, willy nilly.
But that’s actually one of the worst things you can do if you want your canvases to look like the ones you see on social media.
During our time together, you’ll find out why you need to use the right stitches and threads for your canvas – and I’ll share tips for putting stitches and threads together to get some really cool effects.
Look At Your Projects Through The Eyes Of A Needlepoint Artist
You may not think of yourself as an artist, but that’s what you are when you embellish painted canvases with decorative stitches and fancy threads.
It begins with being able to evaluate your needlepoint canvas using the elements of art and principles of design – those things that an artist uses to create a cohesive and beautiful work of art.
After this workshop, you will have a better understanding of how to apply these principles to your projects so that the thread and stitch choices you make will bring your canvases to life!

Unlock Secrets To Confidently Matching Stitches With Threads
I’ll share my process for how you can incorporate different effects into to your works of needlepoint art that reflect your vision for your projects. And the best part? Everything is based on your current skill level.
By the end of the workshop, you’ll have a better understanding of how to narrow your stitch and thread options and overcome that overwhelm!
You can learn more about how to join me for the workshop HERE.
I hope I’ll see you there… 🙂
Alrighty – that’s all for now, my friend!
Thank you for dropping by and have a terrific rest of your day.
Until next time, happy stitching!!
XOXO!!

PS: Check out my new workshop HERE.


These stitches for small spaces are explained so well! The colors really help to guide me not only in the overall outcome but how to stitch them as well. This is invaluable! Thank you so much.
I’m so glad you found the information helpful, Louise! 🙂
Happy stitching!!
Ellen
I’m just returning to needlepoint after a 34 year hiatus and it’s amazing how much I have forgotten. Your diagrams have been a saving grace!!! Thank you for sharing such detailed diagrams.
I’m so glad you’ve found them helpful, Lynda!