
Anchoring your thread when you’re using open stitches can be a little daunting – especially if you’re new to using them on your projects.
Before we talk about how to secure your thread, though, let’s take a minute to define “open stitch”.
An open stitch is one through which the ground fabric shows. In other words, your canvas is not completely covered by thread when you use open stitches.
You can see an example of an open stitch on the “Tuscaloosa” ornament (by Kathy Schenkel Designs) in the picture above. (The water is stitched in the t-stitch, one of the most popular open stitches in needlepoint.)
Admittedly, I’m more of a “full coverage” kind of stitcher. I’m warming up to using open stitches on some pieces, though – especially for backgrounds. In fact, our “Weekend in Provence” virtual needlepoint retreat project features an open stitch background.
Here’s a picture for you…

It’s the couched lines pattern and it allows the focal point of the design to really stand out.
Now, let’s get back to three different ways to anchor your thread when using open stitches…
The first method is to secure your thread in the margin/border, outside the design area.
Not sure what that means? It’s super simple – and exactly what it sounds like – but here’s a picture for you, in case you’re more of a visual learner. 🙂
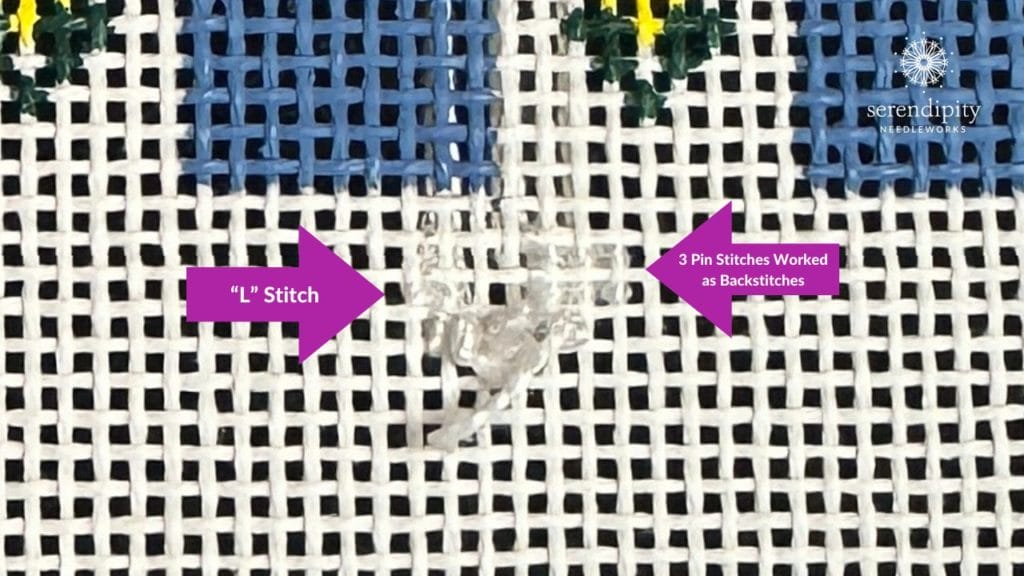
I either work three pin stitches, back to back, or I use an “L” stitch to secure the thread when I’m anchoring in the border.
Be sure to check out my video for how to make an “L” stitch over on Needlepoint TV™, my YouTube channel, if this is a new technique for you. (While you’re there, you can subscribe to Needlepoint TV by clicking the black “SUBSCRIBE” button. That way, you’ll receive a notification every time a new video is uploaded. Pretty cool, huh?! 😉
Another way to anchor your thread when using an open stitch is to secure it in a previously worked area.
How do you do that? It’s pretty simple, too.
Just slide your needle under the stitches in an adjoining area you’ve already stitched. Be sure to do a bargello tuck so that the tail doesn’t slip out. (This is especially important if the area you’re using to anchor your thread is stitched with a pattern that has long-ish stitches or if your thread is on the slippery side.)
Finally, you can anchor your thread in an adjoining unstitched area…
just be sure that whatever stitch you’ll be using for that area does not share a hole with any of your anchoring stitches.
Wondering what that means? Let me explain.
If you’ve been following me for a while, you know that I recommend mapping out a plan for the decorative stitches you’ll use on your canvas. (Ever stitched yourself into a corner? Then you know how frustrating it is to be unable to find something that works well with the others stitches already in place… eek!)
Since decorative stitches come in all shapes and sizes, you’ll have to do some counting first. Make sure that you place your anchoring stitches out of the pathway of the stitch pattern. In other words, the pin stitches or the “L” stitch should not share a canvas hole with the starting or ending point of any stitch that makes up your pattern. (They should be hidden underneath the longer stitches of the stitch pattern.)
We’ll do a deeper dive into all of this in my 2024 MasterClass on using open stitches on your needlepoint projects.
It’s on the calendar for later this year. I’ll share more details in NeedleNotes as we get closer to it. (If you don’t already receive my weekly emails (aka NeedleNotes), you can sign up HERE.)
Alrighty – that’s all for now, my friend.
Thank you for stopping by. Have a terrific rest of your week and I’ll see you again soon.
Until then, happy stitching!!
XOXO


Amazing Ellen! you provided very useful techniques for anchoring threads in open stitch needlepoint projects. Being able to securely anchor threads in borders, previously stitched areas, or adjoining empty spaces will allow crafters to work with open stitches confidently. The helpful photos and recommendations to plan stitch patterns in advance are great resources for both new and experienced needlepoint enthusiasts.
Thank you for your kind words! I’m glad you found the information helpful. 🙂
Ellen
Bargello Tuck? I’m intrigued!
Hi Paula!
The bargello tuck is a super cool way to secure the end of your thread so that the tail doesn’t work its way loose. Keep an eye out for info coming soon. 😉
And thank you for stopping by for a visit to my website.
XOXO!
Ellen