What are stitch pathways? That’s a great question – and it’s a topic that, in my opinion, not enough stitchers know about. See, I believe that understanding stitch pathways is an essential skill for anyone who does needlepoint for a hobby. In fact, I think it ranks right up there with stitch families.
So, what are stitch pathways?
A stitch pathway is the order and direction in which you execute a stitch or stitch pattern. In other words, it’s all about the actions you take to make a stitch on your canvas.
Stitch diagrams are tools that you can use to help you navigate how to complete different stitches on your needlepoint canvases. I like to think of them as little roadmaps.
Here’s my stitch diagram for the mosaic stitch…
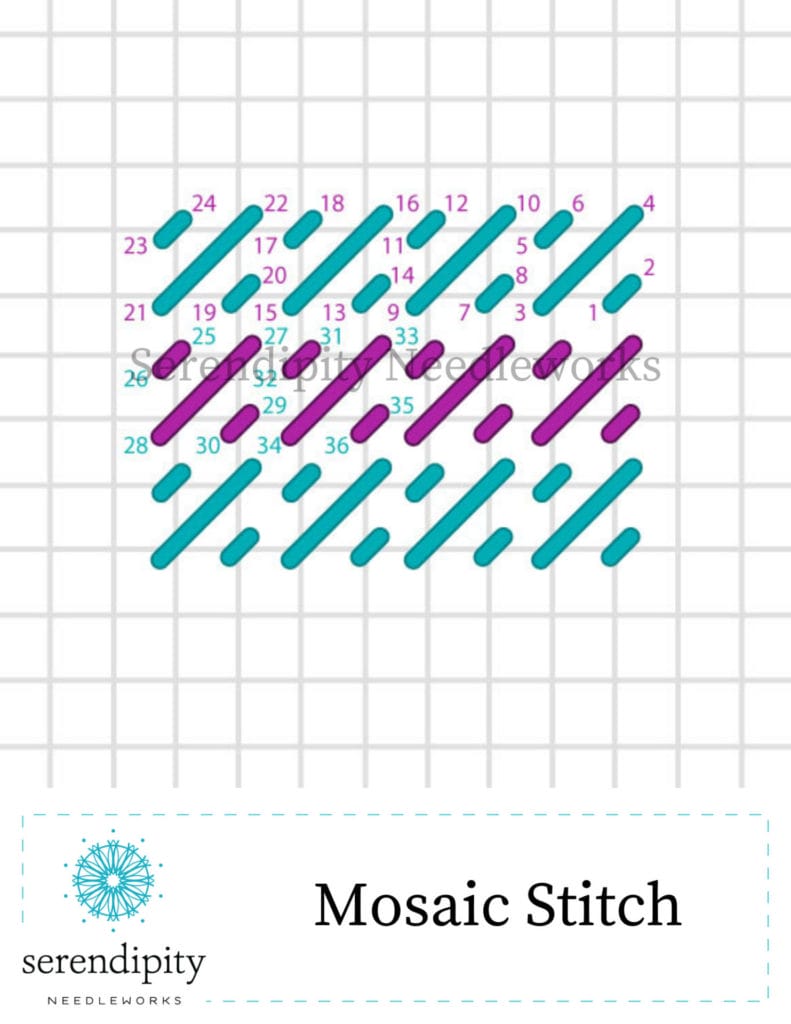
Notice the numbers? Those numbers direct you to where you should begin (at number 1) and the sequence in which to work the stitches in the mosaic stitch pattern (numbers 2 – 36). Lots of stitch diagrams share just a sprinkling of numbers/letters. I like to share extra numbers to help you really get the hang of how to continue the pattern.
And I always include the stitch sequence (i.e., numbers/letters) on my diagrams because I’m a teacher and many of my students are new to using canvas embroidery stitches on their projects. Until you have experience with the different nuances of stitch pathways and how they can affect the way your work looks, it’s helpful to have that extra little bit of guidance. 🙂
You’re definitely going to find stitch diagrams that don’t have numbers/letters, though. As a matter of fact, I can think of a lot of books that fall into that category – and it can be hard for a new stitcher to use them.
And that’s why…
Understanding stitch pathways is super important for stitchers of all skill levels – not just beginners.
I know all of this might be confusing if you haven’t used a lot of decorative stitches on your needlepoint projects. And if you rely on others to help you with stitch selections, this might seem like Greek to you, too.
So I recommend keeping a doodle canvas by your stitching chair – to familiarize yourself lots of different kinds of stitches. Begin by following the numbering system on the stitch diagrams when you practice new stitches. Then, experiment with different ways to work the patterns, altering the order in which you execute the parts of the stitch. You’ll learn so much more by actually “doing”. 😉
Oh – and it’s important to note that there is another term with which you need to be familiar, too: travel thread.
Your travel thread is the actual physical thread that lies on the back of your work. And traveling is when you move from one area of the canvas to another.
The way a thread travels across the back of your canvas affects the way your project looks on the front. Consequently, the subjects of travel threads and stitch pathways are inextricably intertwined.
Need an example?
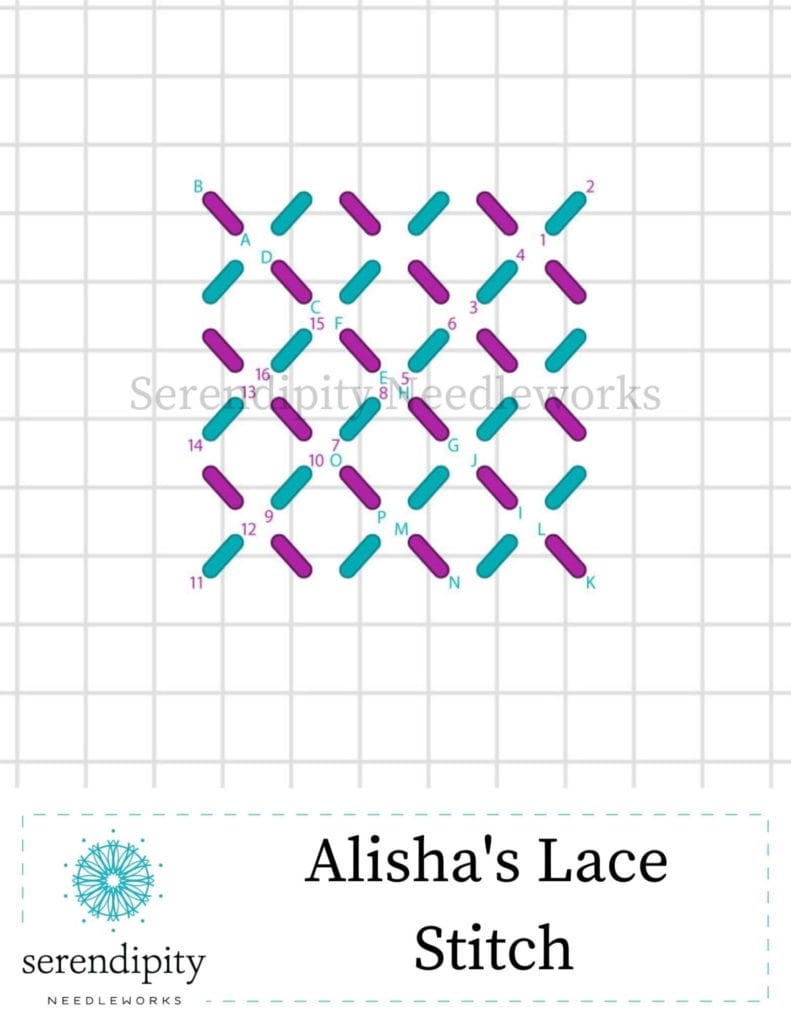
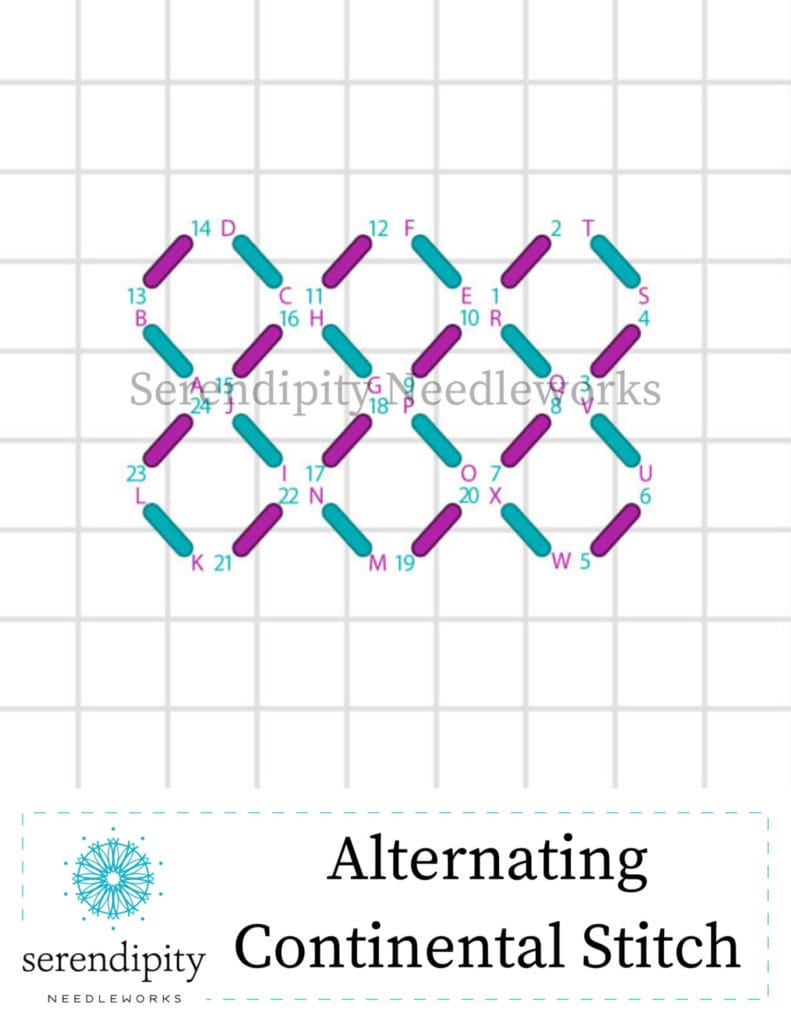
Let’s compare the stitch pathways of the alternating continental stitch and the Alisha’s lace stitch.
These two stitches look very similar when viewing them side by side on the front of your work. When you examine them more closely, however, you’ll see that the stitch pathway of Alisha’s lace does not obstruct the canvas holes. It has a lacy appearance.
Conversely, the alternating continental stitch has a pathway that DOES obscure the canvas holes, giving it a more solid appearance.
Click here to learn more about each of the different stitch pathways.
And for more needlepoint goodness, be sure to check out our YouTube channel.
Okey dokey, my friend – that’s all for now.
Have a terrific rest of your day and, until next time…
Happy Stitching
XOXO!!






This is great info. I do have a question on stitch diagrams. When you see a stitch diagram with both numbers and letters, what do the letters represent??
Hi Donna
I’m so glad you found the info helpful. 🙂
You have a terrific question – when you have both letters and numbers, it’s usually an indication that there are two steps to creating the stitch pattern. I begin by working the stitches with numbers, then I complete the pattern by working the stitches labeled with letters.
Happy stitching!!
XOXO!
Ellen
Thanks Ellen. I still struggle a bit with Alicia’s Lace and alternating Continental. I can do on a doodle canvass but in projects with compensation, I have to really concentrate and can get lost. I keep trying though 💖. Your tips are so helpful.
Hi Martha!
Thank you for taking the time to write. 🙂
Compensating can present challenges, for sure! Sometimes you have to turn your work over and weave the needle and thread under previously worked stitches to get yourself back to a place where you can continue stitching the pattern. I hope this helps… and if you have any questions, just let me know. I’m happy to help!
XOXO!
Ellen