
Do you ever wonder how many needlepoint stitches there actually are? When you see all of the beautifully stitched pieces in shops and on social media, it can seem like there must be hundreds and hundreds. And, technically, that’s correct. There are A LOT of canvas embroidery stitches that you can use to embellish your needlepoint canvases. But if you’re talking about “the” needlepoint stitch, there are really only 3 variations of the same stitch – the tent stitch.
All three variations of the tent stitch look the same on the front of the canvas, but when you turn your work over, it’s a whole ‘nother story. Whaddya say we take a peek at each of them a little more closely?
The first basic needlepoint stitch is the half-cross stitch.
The half-cross stitch uses the least amount of thread of all three variations. I know that might sound like a good thing, but it has its drawbacks. See, when you use this variation of the tent stitch, you’re more likely to see canvas peeking through. That’s because the half-cross stitch doesn’t cover very well.
And because the half-cross stitch doesn’t cover the canvas very well, it’s a lot less durable. That means your projects won’t be as sturdy – especially things like pillows, belts, Christmas stockings, etc. – those things that get a lot of “love”. 😉
Even though it’s my least favorite of the basic needlepoint stitches, it’s still useful to know how to do it – and recognize it!
So, without further ad0, here’s the stitch diagram for the half-cross stitch…

Start at the top left edge of your needlepoint canvas – or at the top left edge of the area on your canvas that you want to stitch. Work across the horizontal row, from left to right. When you get to the end of the row (or the edge of the area), turn your canvas upside down and repeat. If you see short upright/vertical stitches on the back of your work, you are golden! Your half-cross stitch is correct… YAY!! 🙂
Moving right along, we have the continental variation of the tent stitch.
This is the needlepoint stitch that my Granny taught me to do. It’s how she did needlepoint – and I thought it was the only stitch there was when I opened Serendipity Needleworks as a local needlepoint shop back in 2003. (But that’s another story for another day… 😉 )
All of that to say, the continental variation of the tent stitch has a special place in my heart. It’s a stitch that you will find yourself using over and over again. It’s very durable, but it does have a tendency to distort the canvas if you’re not careful. (Time to insert a shout out for using a frame!)
It’s especially useful when you have a single row of tent stitch to work on a piece.
Here’s the stitch diagram for you…
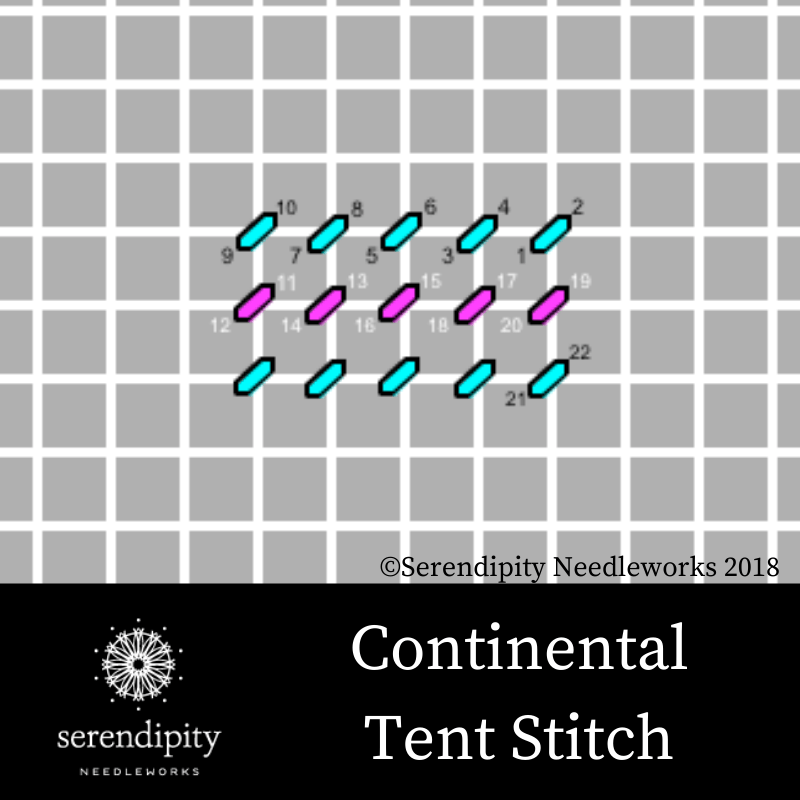
Notice how you begin on the right edge of your canvas (or of the area you are stitching) with this variation? That results in long slanted stitches on the back of your work. And it means that you have a lot of thread on the back, too. That’s what makes it so sturdy.
You can flip your canvas upside down when working in continental tent stitch – just like you can with half-cross. I prefer to keep my canvas upright when I’m stitching, though. And that’s how the diagram is drawn.
Because I work the continental stitch the way I do, I need to bring my needle up in a hole that already has a stitch resting in it when it’s time to work a row from left to right. If you choose to work with your canvas upright all the time, follow my diagram – and be extra careful not to split any thread already occupying a canvas hole.
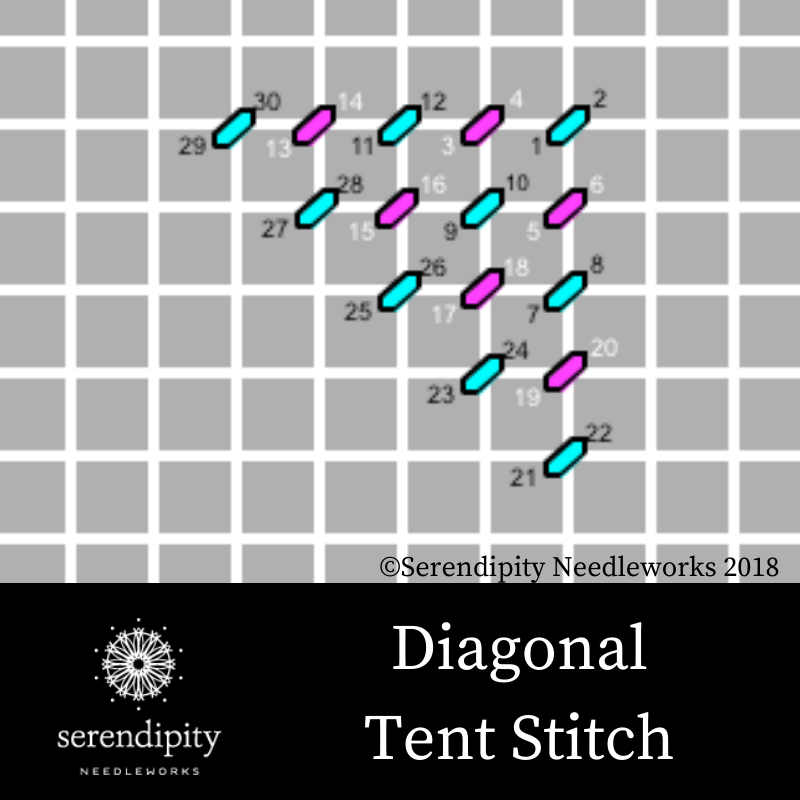
And that brings us to the last of the basic needlepoint stitches – the diagonal tent stitch.
You’ve probably heard it called basketweave. It gets its nickname from the way the stitches look on the backside of your work.
I consider this variation of the tent stitch to be the workhorse needlepoint stitch. I use it more than the other two since it’s very durable and it is less prone to distorting the canvas. It covers the canvas extremely well, too.
The diagonal tent stitch is worked in – wait for it – diagonal rows. 😉
Here’s the diagram for you…
Getting the hang of basketweave can take a little longer than the other two basic needlepoint stitches, so give yourself some grace.
When working in basketweave, you should begin in the upper right corner of the area you’re covering, working down and to the left in diagonal rows. (If you’re a lefty, begin in the lower left hand corner and work up and to the right.)
Since you’re almost always working from an unoccupied/empty canvas hole with this variation, you’re less likely to split the thread of previously worked stitches. And that means your work will look neater, which is always a good thing.
Of course, there’s a lot more to needlepoint than just these three variations of the tent stitch.
So, if you’re new to needlepoint, have been away from it for a while, or are self-taught (with, perhaps, some bad habits to break), be sure to check out my online course, Needlepoint Made Easy™. It’s self guided and is designed to help you establish a rock-solid foundation for your needlepoint hobby.
Alrighty – that’s all for now, my friend. Have a terrific rest of your day and, until next, time…
Happy Stitching 🙂
XOXO!


When I first started needle work I started with cross stitch, so that was only 1/2 part of half cross stitch. Later I got into needlepoint and learned Continental and Basketweave. I loved Basketweave so I was hooked. My first piece was in a class learning at least 15/20 🤷♀️ stitches, that was 47 years ago. I took a break but came back when I found Ellen last year in October and have loved every minute of it.
Awww.. thank you so much for your kind words, Mary. I’m tickled that you found me and that you’re part of our Serendipity Needleworks and Stitcher’s Club families!
And I’m with you about being hooked on basketweave! It really is meditative… I could do it for hours. 😉
XOXO!
Ellen
Thank you for this. I have been working basketweave incorrectly!
I’m so glad you found it helpful, Eleanor!
XOXO!
Ellen
Thank you for the in depth explanation! Of course I have known the three basic stitches for many years, but I do not remember knowing the “coverage” difference of the three. Like you I did not know (until the past decade) more than three stitches were available for use in needlepoint! ARGHH!
Next: I am right handed – almost completely. But there is a catch with my hand sewing: when I was learning I was watching my great-grandmother from her front face view – NOT from behind her. Consequently, I usually am going in the opposite direction of right handers, more like a lefty.
Thankfully, (about 1956) I did watch her from the back or side view when I was learning to use a treadle sewing machine.
Love your notes any day of the week!
Hi Shelley!
I’m so glad you found the info helpful.
And that’s so interesting about how you learned to stitch. I’ve heard of teachers telling left-handed students to sit across from them and do what they do so that it “translates” as a mirror image, but I believe your story is a first for me. 🙂
Through the years, I’ve become relatively ambidextrous with my needlework – and writing on a chalkboard. (Teehee!) Thank you for letting me know when you prefer to get NeedleNotes, too!
Have a terrific rest of your day…
XOXO!
Ellen
I have a problem splitting threads on the back no matter which stitch I use and how careful I am. How do you avoid it, without needing to turn the canvas over to check for each stitch? Thank you.
Hi Margy
That’s a great question – and the best way to overcome the problem is through touch – and practice. 😉
My best suggestion is to use your non-dominant stitching hand to feel the thread/previously worked stitches on the back as you take each new stitch. Try keeping your finger on top of the thread/stitches. If you can feel the needle encroaching upon the previously worked stitches, adjust the needle tip and try again.
If your stitches aren’t distorted on the front of your work, though, splitting threads on the back isn’t going to make a big difference in your finished project.
Oh – and keeping your needle perpendicular to the canvas when taking your stitches should help, too.
Happy stitching…
XOXO!
Ellen