
I’m having soooo much fun sharing all of these different canvas embroidery stitches that you can use to embellish your needlepoint projects. Thank you for joining me! 🙂 Now, let’s do a quick recap of what we’ve covered so far: straight stitches, slanted stitches, and crossed stitches. And this week, we’re gonna take a peek at knotted stitches.
Before you get your knickers in a twist, let me put your mind at ease about knotted stitches. They’re really not as hard as you might think. Just give yourself some grace – and plenty of time to practice – and before you know it, you’ll be a “knot-meister”! 😉
So, what exactly is a knotted stitch?
That’s a great question! Knotted stitches are embroidery stitches that are formed by wrapping the thread around itself in various configurations. They add depth and dimension to your work because they sit up higher than most other stitches.
Let’s use Melissa Shirley’s cutie pie canvas, “Floral Heart”, for our study canvas this time.
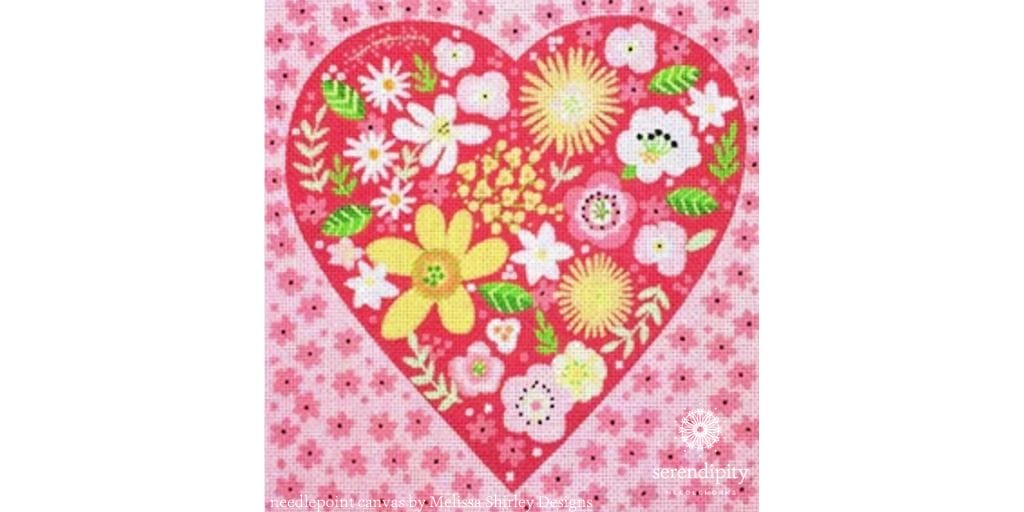
Alrighty, first we need to identify the design components…
- flowers (lots and lots of them!)
- leaves
- the heart,
- background
- dots on the background
For our purposes here, we’ll narrow our focus to the details on four design components: the centers of the rose-colored background flowers, the center of the white flower in the top right section of the heart, the center of the large yellow flower, and the orange centers of the white daisies.
Next, we need to make lists of descriptive words for each of those design components. Then, it’s time to brainstorm all the different thread options. And, of course, you can begin browsing through stitch books, too.
Since we have just a wee bit of time, I’m gonna share some of my favorite knotted stitches with you. You can definitely use them on this canvas, or on any canvas featuring similar design components. (And in addition to being terrific options for flowers, they’re also especially good for stitching hair and beards.)
We’ll start with my all-time favorite stitch – the French knot!
You can work this stitch as a “stand-alone” stitch or in clusters. And here’s a little bit of stitch trivia for you… a true French knot is only one wrap around the needle! Yep – any more wraps and you have a bullion knot. (We’ll chat more about that stitch later.)
I almost always work my French knots over a canvas intersection to ensure that they “stay put”. The exception is when I’m using them for surface embellishment on top of already stitched areas.
French knots are a terrific choice for the centers of the rose-colored flowers on the background of this canvas.
Why? Well, let’s consider texture first. Flower centers are usually round-ish, aren’t they? And French knots are round, too – making them a perfect match. Use one of the wildly variegated colors of Impressions from Caron Collection to add a touch of pizazz and Voila! Those small simple flowers all of a sudden become a whole lot more eye-catching. In fact, your eye moves from one flower to the next because each one looks just a tiny bit different. And since you’re using a single-wrap true French knot, their size conveys an accurate sense of perspective for a design component that’s in the background – small and unobtrusive.
Here’s a diagram of the French knot for you…

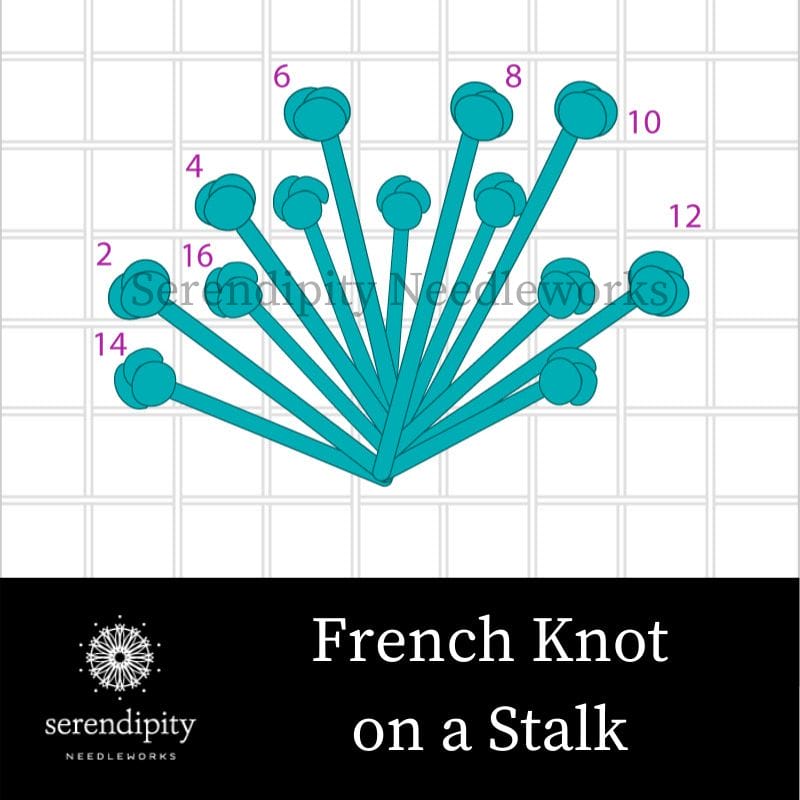
Next, let’s take a peek at French knots on a stalk.
They’re easy peasy to execute and are exactly what they sound like – a French knot at the end of a long stitch (the stalk).
Using a French knot on a stalk for each stamen in the center of that large white flower adds just the right amount of texture to an otherwise plain design component. A fun (and practical!) idea is to use the same multi-colored Watercolours thread here, too.
Every stamen would be slightly different – just like the centers of the rose-colored flowers are all different – but the overall unity of the design would remain intact since you’re using the same thread for both flowers.
And the movement of the color along the length of thread creates a sense of movement on the canvas. Since the white flower is a larger design component, it also stands to reason that it can “handle” a larger stitch. And French knot on a stalk is definitely larger than a single French knot.
Here’s a diagram of the French knot on a stalk…
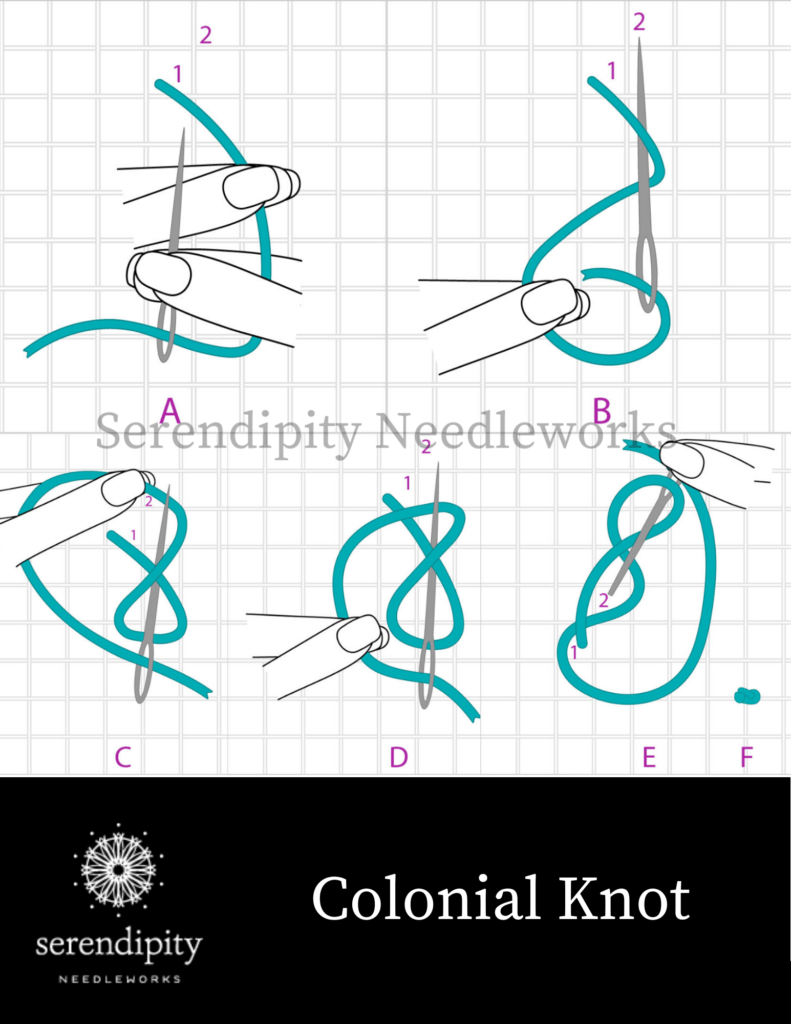
Now, let’s look at the colonial knot.
Sometimes, you’ll hear it called the figure-8 knot. That’s because your threaded needle follows a figure-8 pattern in the execution of the stitch. Again, I almost always work this stitch over a canvas intersection to ensure its stability.
The colonial knot and the French knot look very similar and I know lots of stitchers who use them interchangeably. If you have trouble with French knots, give the colonial knot a try and, conversely, if you just can’t get the hang of wrapping your thread around the needle in the figure 8 motion, stick with French knots. It’s been my experience that colonial knots are a wee bit larger than French knots. And they’re slightly wider, too – not quite as round as French knots.
There are six green dots on the center of the large yellow flower.
They’re largish in size, so this is the perfect place to sprinkle in some colonial knots. If you really want to add some texture, work two or three colonial knots for each green spot. And, again, use the same Watercolours thread used for the other knot stitches. The clusters of colonial knots maintain the proper perspective due to their size and the use of a multi-colored thread, again, creates a sense of movement.
Here’s a stitch diagram of the colonial knot for you…
Finally, let’s wrap (tee hee!) things up by taking a look at the bullion knot.
This is another one of those stitches that gets a bad rap. (Oh dear – now I’m really getting corny!) Seriously though, bullion knots aren’t as hard as some stitchers make them out to be.
Whaddya’ say I share one of my favorite “tricks of the trade” with you?
I guarantee it’ll make bullion knots a whole lot easier. 😉
If you’ve ever tried to make a bullion knot with a tapestry needle I’ll bet you got your neat little wraps to slide all the way down the length of your needle – until you encountered the eye. And then, they wouldn’t budge.
Not. Even. A. Millimeter.
That big fat eye stopped you dead in your tracks, didn’t it? And those wraps wouldn’t budge unless you pulled and tugged to wrangle them over.
Problem is, all that pulling and tugging inevitably results in a loopy mess of wraps that are lop-sided and ugly. And trying to cinch them up usually creates the mother-of-all-knots that you eventually end up having to cut loose.
Enter the bullion needle…
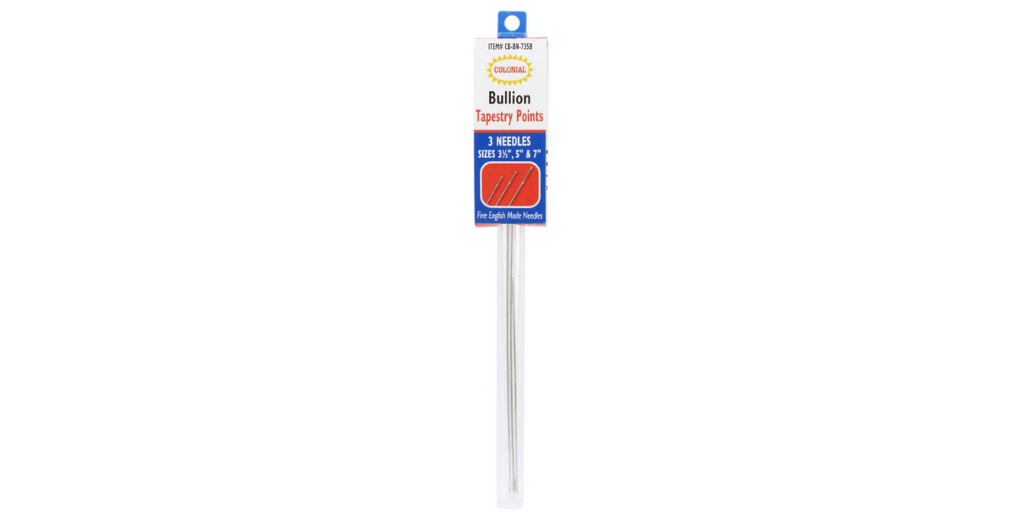
These handy dandy needles, from The Colonial Needle Company, come three to a set. Each one is a different length. I like the shortest needle best. Most needlework shops carry them or can, at the very least, special order them.
What’s so special about a bullion needle? It’s really very simple. You see, the eye of a bullion needle is the same diameter as the shaft – and therein lies the magic. When you slide your neatly wrapped coil of thread down the shaft of a bullion needle, it glides all the way off the end (and over the eye!) without a hitch. No more pulling and tugging!
A single strand of thread is always more manageable when you’re executing bullion knots…
and I adore using pearl cotton. It has a slick, shiny finish that makes manipulating the wraps a breeze. The yellow chrysanthemum-looking flowers on this canvas would be spectacular with bright yellow bullion knots in a starburst arrangement at the center. Placing them in that manner adds scads of texture and dimension to the finished work.
Then there’s movement. The starburst effect creates a distinct sense of movement, leading your eyes to other parts of the canvas. And finally, when considering perspective, if you execute the bullion knots over the yellow painted lines on the canvas, you’re maintaining the artist’s proper use of perspective.
Click here to watch a video on how to execute the bullion stitch over on our YouTube Channel.
Whew! That’s a lot of thinking before stitching, isn’t it?
But you know what? All the pre-planning and testing makes a huge difference in your finished project.
When you take the time to consider all the different design components on a hand-painted canvas – and how they relate to one another – you’re much more likely to create an aesthetically pleasing finished project.
Alrighty, my friend, that brings us to the end of our chat about knotted stitches. You could definitely use these same four stitches in all sorts of other configurations, especially when you pair them with different threads. (Remember – they work beautifully for Santa’s beard, too!)
Test out different combinations on a doodle canvas. Invite your inner artist to come out and play, and most of all, have fun!!
Next time, we’ll wrap things up by exploring looped stitches. 🙂
Until then, happy stitching…
XOXO!!
PS: Please join me on Tuesday at 2:00 p.m. CDT for another episode of Needlepoint TV™.
You can watch from the Serendipity Needleworks Facebook page or our YouTube Channel!


