
WOW! It’s hard to believe that we’re already to our last stitch family that we’re going to explore in this series of blog posts! Are you ready to dive into loop stitches? Terrific! Me, too.
A loop stitch is a needlework stitch that has one or more loops as part of the pattern and execution.
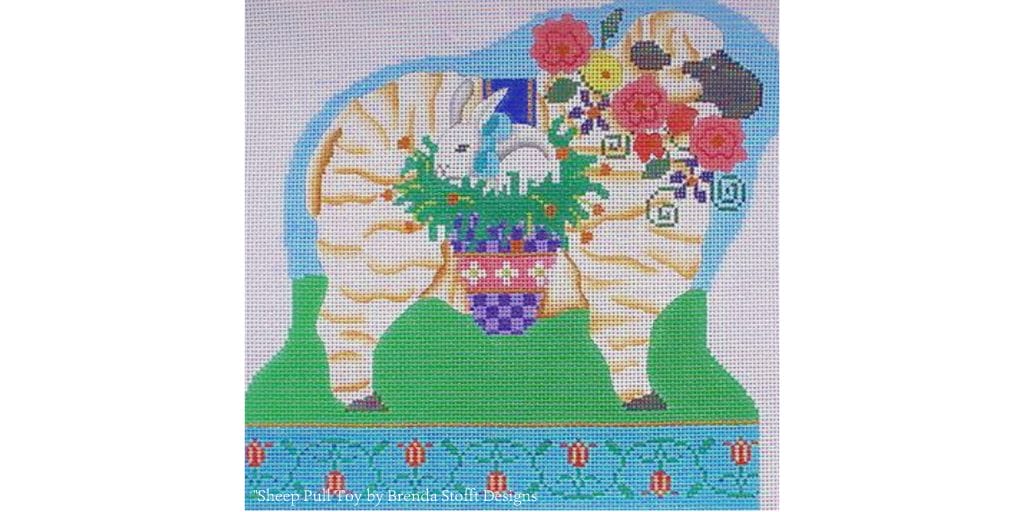
We can use loop stitches to add depth, texture, and movement to our hand painted canvases, transforming them from flat designs into three-dimensional works of fiber art. It’s much easier to get a solid grasp on what you’re learning when you have a canvas to reference and this adorable “Sheep Pull Toy” by Brenda Stofft Designs is the perfect study canvas for our topic today…
It’s a simple design – even though the sheep features a good bit of shading. Simple designs, by definition, are those that have blocks of color and minimal shading. They’re perfect for stitchers of all skill levels but are especially good for beginners and those who are new to using decorative stitches.
Alrighty, let’s get started by identifying the design components on this cutie-pie canvas…
- sheep
- basket harness
- basket
- foliage (in the basket)
- orange tulips (in the basket)
- bunny
- bow (around the bunny’s neck)
- floral wreath (around the sheep’s neck)
- sky
- grass
- bottom border (comprised of tulips, vine/leaves, and background)
For our purposes here, we’ll narrow our focus to just four of the design components…
- dark purple five-petal flowers (on the wreath around the sheep’s neck)
- foliage in the basket
- grass under the sheep’s hooves
- bottom border – specifically the vine/leaves.
And, of course, our next step is to make lists of descriptive words for each of those design components. (If you missed my first article in this series that explains how to do that, click here to catch up.)
After you create your lists, it’s time to begin thinking about thread options. And you can start browsing through stitch books, too. 😉
Now, whaddya’ say I share some of my all-time favorite loop stitches – and the threads for working them – with you?
We’ll start with the simplest of all the loop stitches – the detached chain stitch.
You might know it by a more common name – the lazy daisy stitch. Since it’s a freestyle surface embroidery stitch, you can work it vertically, horizontally, or diagonally so that it fits in whatever space you’re trying to fill.
Wondering what the heck “freestyle surface embroidery” is? I thought you might be. 😉
Freestyle surface embroidery stitches are those stitches that are not counted; the design is not constrained by the weave of the ground fabric. There’s no “right” number of canvas threads to work these stitches over, so that makes them super versatile because you can make them as large or small as you want. (Loop stitches and knotted stitches are both families of stitches that are freestyle surface embroidery stitches.)
Lazy daisy stitches are a terrific option for the dark purple flowers on the wreath around the sheep’s neck.
I’m sure you’ve seen scads of lazy daisy flowers in your life – on everything from denim jackets to kitchen towels – and they probably looked very similar to these five-petal flowers. Of course, you could execute the lazy daisies in any kind of thread, but my choice would be to use 4 mm River Silks ribbon (in color #204 – ooh la la!) to create dimensional flower petals. And the 4 mm silk ribbon is wide enough so that you won’t even need to stitch the petals in tent stitch first unless you just want to.
When considering the elements of art and principles of design that we’ve been focusing upon – texture, perspective, and movement – you knock it out of the park with all three by using silk ribbon to execute the detached chain stitch here. The petals have much more texture than flat, tent stitch petals would have and they appear closer to the viewer because you’re layering them on top of the sheep’s fleece. And the fluidity of the ribbon conveys a sense of movement.
Here’s a diagram of the detached chain (a.k.a. lazy daisy) stitch for you…

Think of stitch diagrams as your roadmap. Use the numbers as your guide for where to place your needle (bring your needle to the front of your canvas on odd numbers and take your needle to the back on even numbers). Just follow the map and you’ll be golden!
Next, let’s take a peek at the long-drop lazy daisy stitch.
You may work this loop stitch horizontally, vertically, or diagonally, too. It takes up more space than a standard lazy daisy stitch and it’s also a freestyle embroidery stitch, so you can adjust the size to the area you have to work within.
The long-drop lazy daisy stitch is one of my “go-to” stitches for vegetation, especially when you pair it with its sister stitch, the detached chain (aka, lazy daisy) stitch. And that’s exactly how we’re gonna use it here!
Choose a verdant green overdyed pearl cotton #5 from Threadworx (color 51048/Woodland Green would be my pick!) to stitch your very own lush basket foliage. And sprinkle in some lazy daisy stitches – using a different shade of green and a different type of thread (think Threadworx 6-strand cotton embroidery floss in Tropical Green/1047) for additional visual interest.
The two different types of thread create a rich texture and, since you’re layering the stitches on top of the sheep’s fleece, you’re achieving the proper perspective, too. Additionally, the combination of two different stitches evokes a sense of movement, as well as depth, to create realistic looking greenery.
Here’s a diagram of the long-drop lazy daisy stitch for you…

Now, let’s take a peek at the tête-de-boeuf stitch.
The tête de boeuf stitch also goes by the name “ox head” and “detached wheat-ear” or “wheat-ear”. You’re likely to find contradicting diagrams for this stitch, so I’m gonna take just a minute to give you some background info. Sound good?
Alrighty – first, here’s the diagram for the “original” tête de boeuf stitch. See how the “horns” are on top of the bull’s head?

But there’s another diagram circulating with the same name. Here’s that diagram…
![]()
Notice how the “horns” are below the bull’s head in this one, making it look more like a flower?
Speculation is that a reeaaalllly long time ago there was a printing error and the “horns” were misplaced under the detached chain stitch, thus, creating an entirely different stitch. I like to keep them straight by referring to the original tête de boeuf as the “ox head” stitch and the tête de boeuf variation as the “wheat-ear” stitch. When you look at the diagrams, you can see how they really do resemble their everyday namesakes.
Alrighty – let’s get back to how you can use those loop stitches on our study canvas.
You may work the tête de boeuf stitch and its variation as single units, in straight lines, or as a filling stitch.
I’m recommending that you use the variation as a filling stitch to add texture to that large green area under the sheep’s hooves. The tête de boeuf variation is a smallish stitch and that makes it the perfect option for communicating proper perspective in the overall design. And because the stitch units are offset in each row, the pattern trajects a sense of movement. To amplify that sense of movement, use an overdyed thread like Watercolours #065/Emerald. The monochromatic rich green is reminiscent of lush spring fields bursting forth with new life.
Finally, let’s take a look at the stitch for the vine design component in the border on our canvas – the chain stitch.
You may choose to work the chain stitch vertically, horizontally, or diagonally since it, too, is a freestyle surface embroidery stitch. In needlepoint, you typically execute it over at least two canvas threads.
The chain stitch evokes a distinct sense of movement and that’s what makes it so appealing as a stitch for vines.
Pair it with an overdyed thread, like Threadworx’s Hand Overdyed Pearl Cotton, and it mimics the long thin stem of a trailing or climbing flower. Following the painted lines on the canvas, the chain stitch may be worked in a freestyle manner to fit the space precisely, keeping proper perspective intact. And the loop construction of the chain stitch repeats the use of other types of loop stitches used in the design to contribute to the unity of the finished project.
Here’s a stitch diagram of the chain stitch for you…

Alrighty, my friend… that brings us to the end of our chat about loop stitches that you can use to embellish your painted needlepoint canvases. Of course, you may use these loop stitches in countless other ways, too. When you match them with different threads, the sky’s the limit! Let your imagination run wild; play around with different combinations on a doodle canvas. As always, I can’t wait to see what you come up with. 😉
It’s been oodles of fun sharing all of these stitch and thread combinations with you! In case you just found my website, you can catch up on the other blog posts in this series by clicking on the links below:
Straight Stitches for Your Needlepoint Canvases
Slanted Stitches for Your Needlepoint Canvases
Crossed Stitches for Your Needlepoint Canvases
Knotted Stitches for Your Needlepoint Canvases
And now, I have a super-exciting announcement to share with you before I go.
(HINT: You may already know this – especially if you’re a subscriber to my YouTube Channel.)
Okay, ready, set, and cue the drumroll… 😉
I’m hosting a brand new one-day needlepoint workshop on October 17!
It’s called Stitch Guides Made Simple LIVE™ and it’s all about learning how to use my signature system for writing stitch guides for your needlepoint canvases. If you want to learn more about the workshop, click here!
It’s gonna be AHHHH-MAZING and I hope you’ll join me. 🙂
If you have any questions, please reach out to us at [email protected].
As always, we’re here for wonderful Y-O-U!!
Okey dokey – that’s all for now.
Until next time, happy stitching…
XOXO!! ❤️

PS: CLICK HERE to learn more about how you can join me for Stitch Guides Made Simple LIVE™!


I’ve been trying to stitch lazy daisy stitches to add detail to a needlepointed sand dollar. I make them when I do crewel and straight embroidery with no problem. But I cat keep the petals open on the needlepoint. What can I do?
Hi Gail
That’s a terrific question. I have a short video on how to do lazy daisies on your needlepoint canvas. Here’s the link: https://www.youtube.com/watch?v=EjrJiQS3v0Y
I hope you find it helpful. One thing to be very mindful of is to make sure that you don’t pull too tightly. You have to “ease” the petal into place and gently secure the loop to the canvas.
Happy stitching…
XOXO!
Ellen